1. Introduction
1.1 About
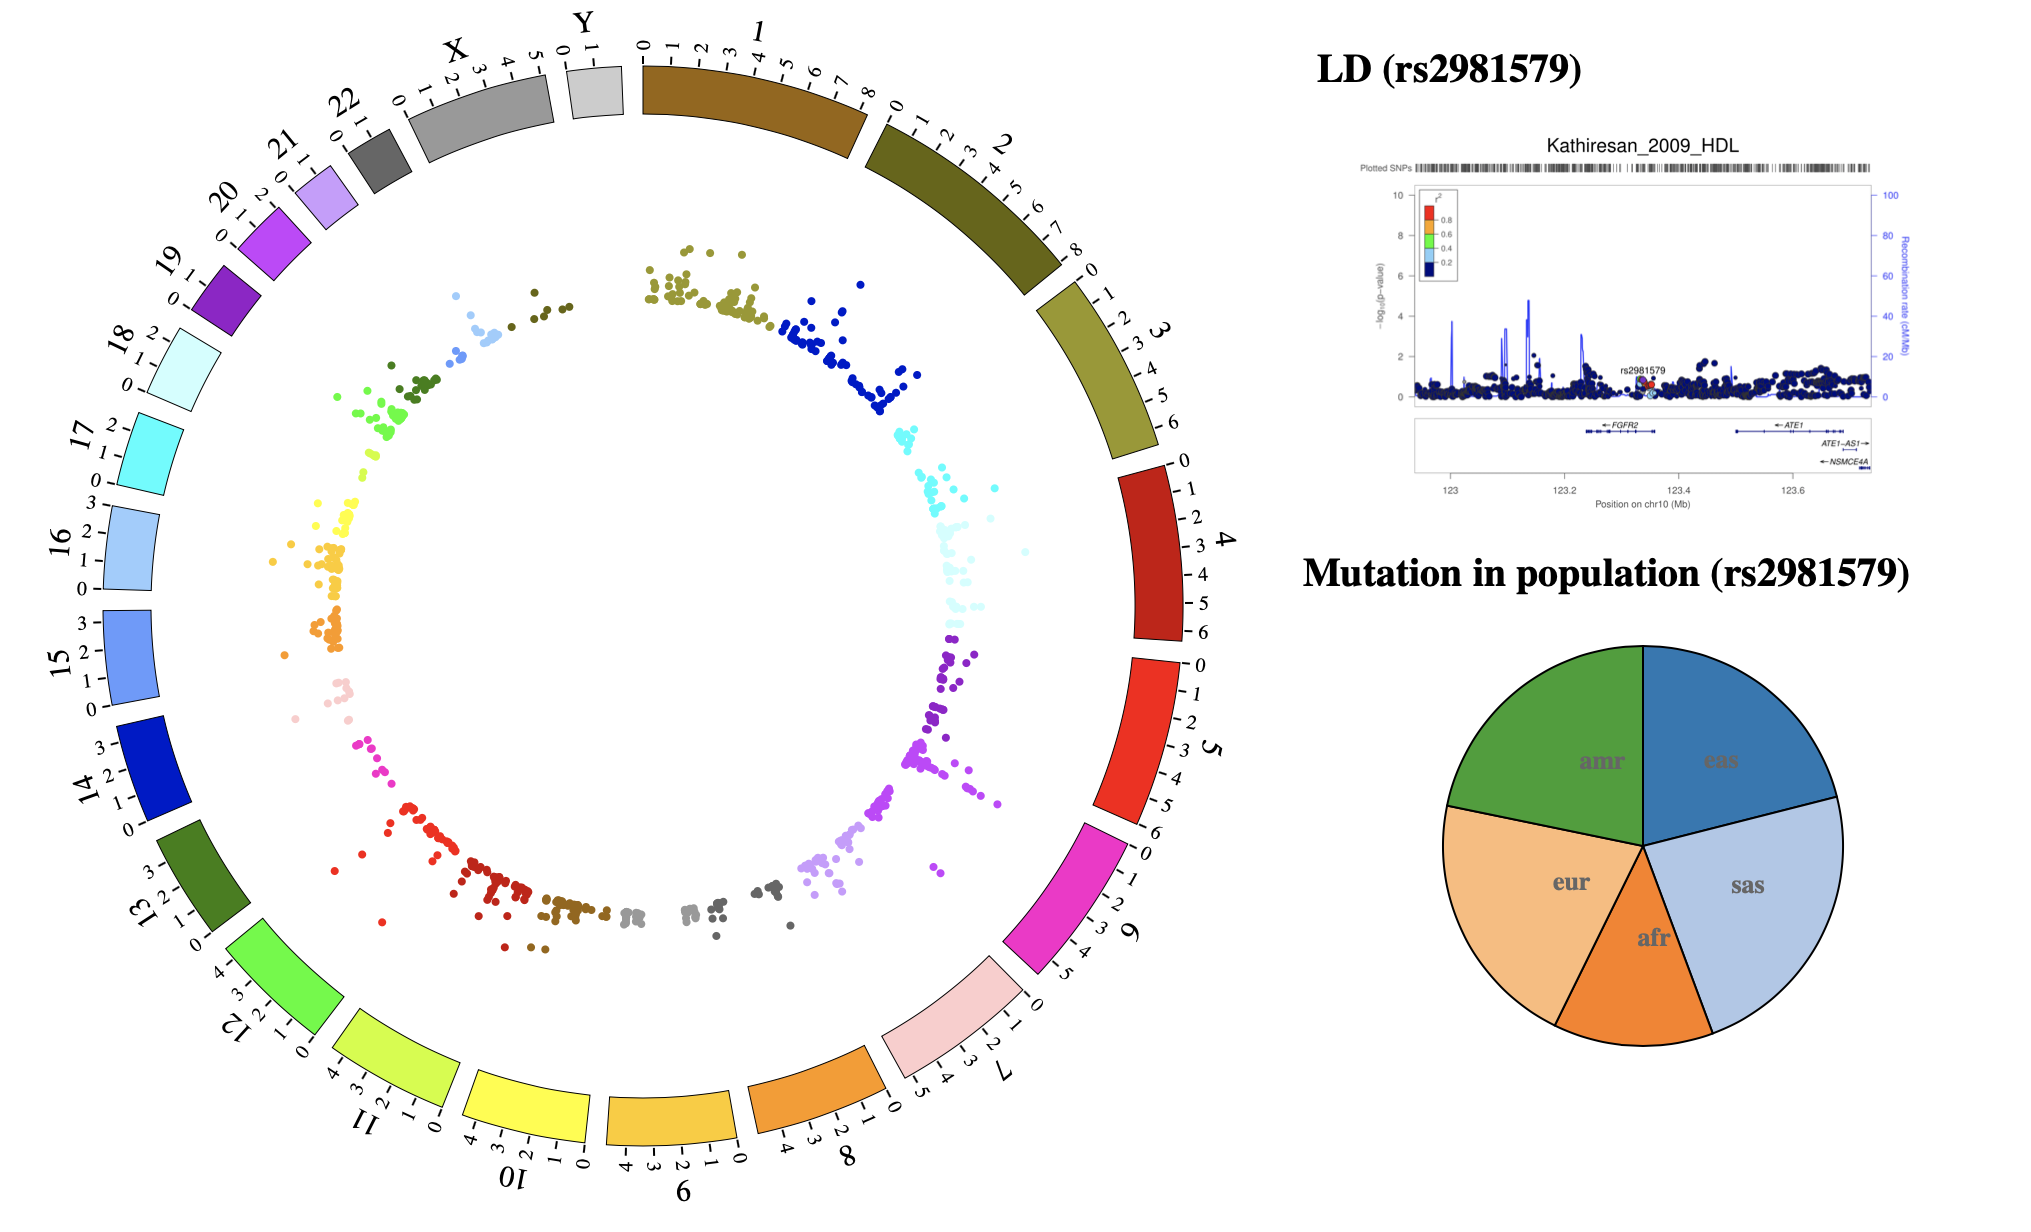
NG-Circos is an interactive circular genome visualization tool to present and interpretate diverse types of genomic data based on web features.. It implements a raster-based SVG visualization using the open source Javascript framework jquery.js. NG-Circos is multiplatform and works in all major internet browsers (Internet Explorer, Mozilla Firefox, Google Chrome, Safari, Opera). Its speed is determined by the client’s hardware and internet browser. For smoothest user experience, we recommend Google Chrome.
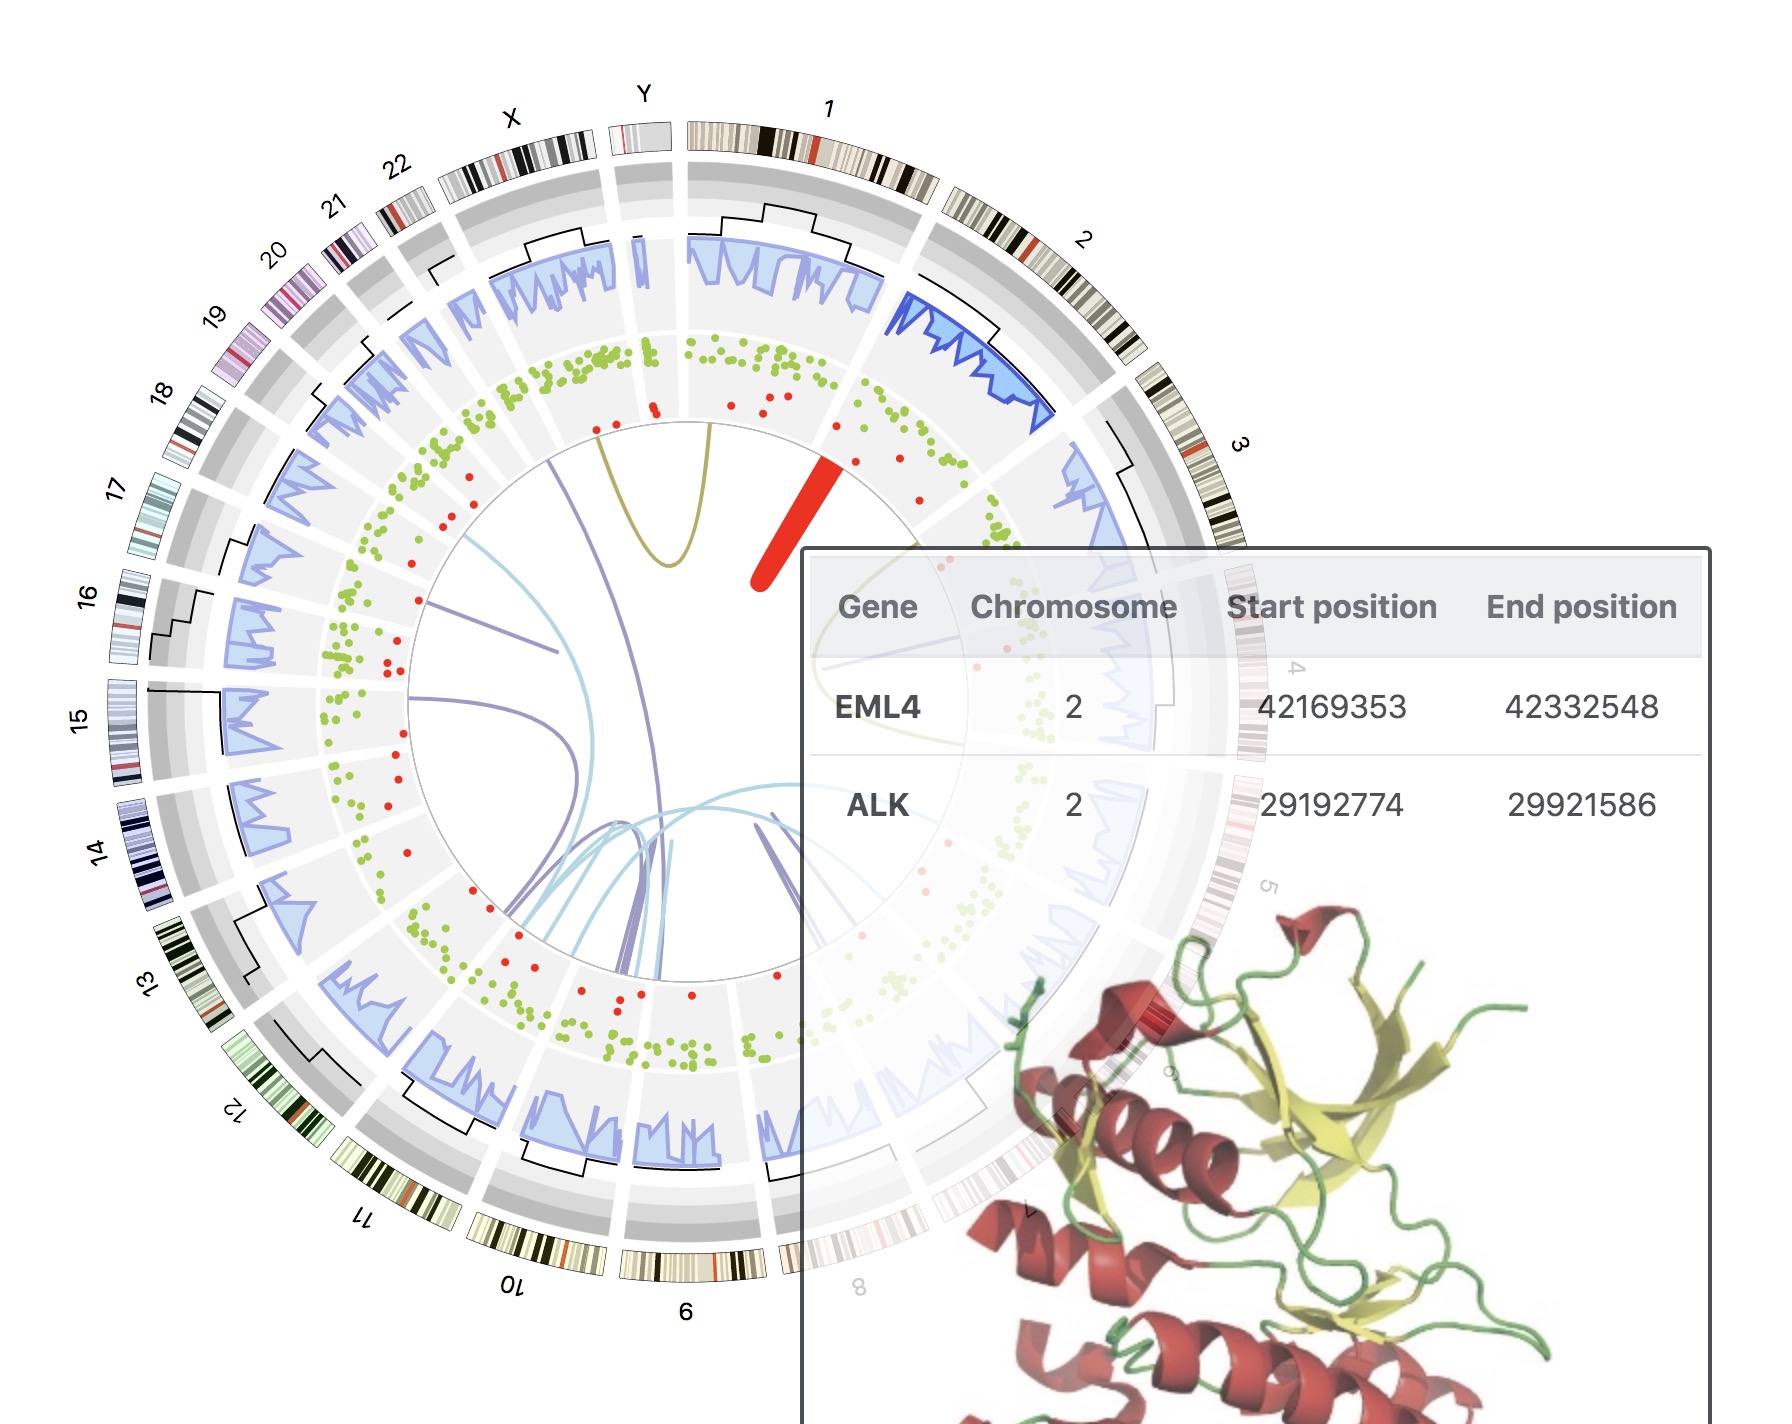
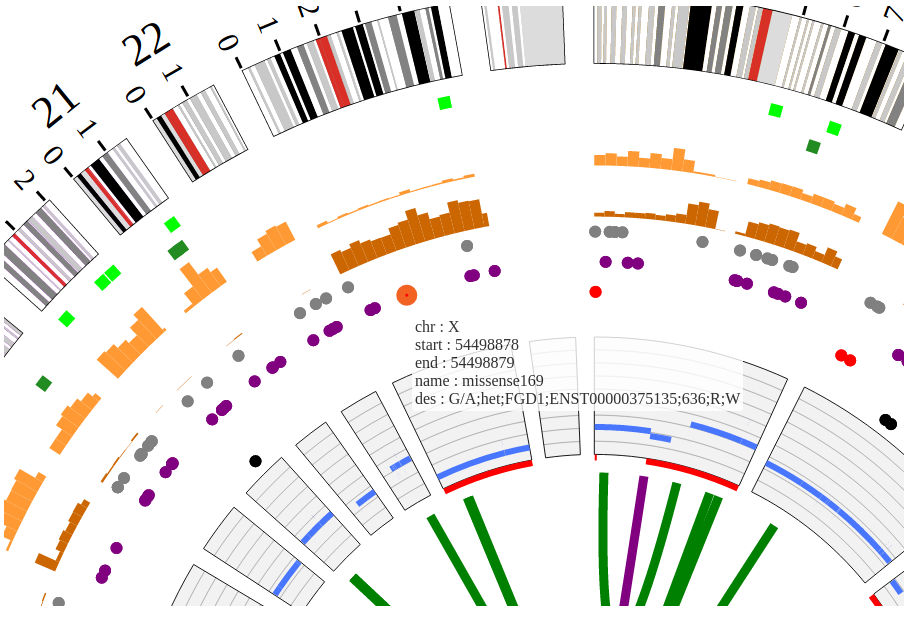
NG-Circos can visualize popular genomic data format (such as WIG and GTF), construct various graphic elements (such as line, scatter, bubble and heatmap) and display/compare multiple genomic features, annotations and associations (such as genomic variations, expressions and gene fusions) in or between genomic intervals with 21 functional modules. NG-Circos also provides flexible interactive events and fascinating animations for each graphic element. Figures created by NG-Circos are publication-quality and downloadable.
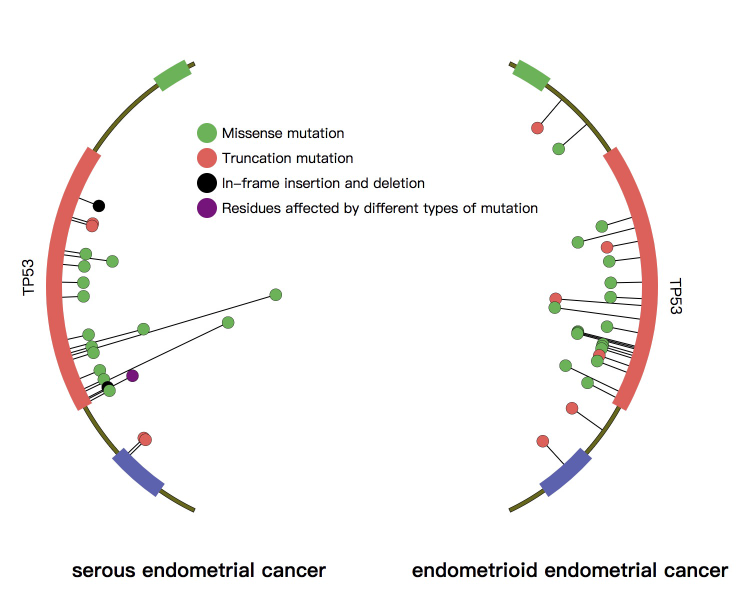
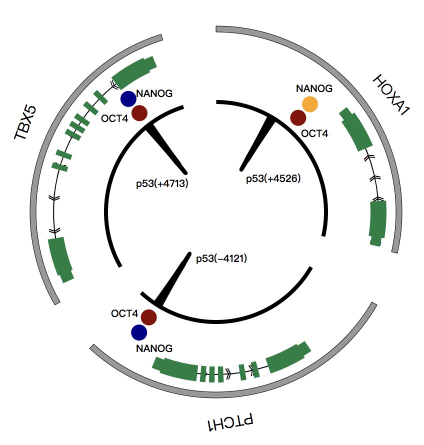
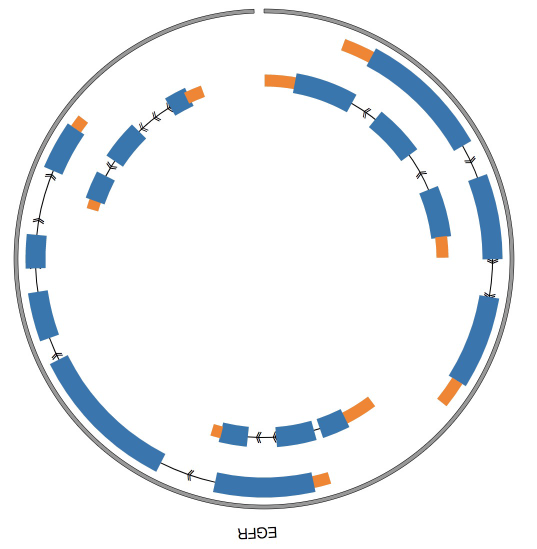
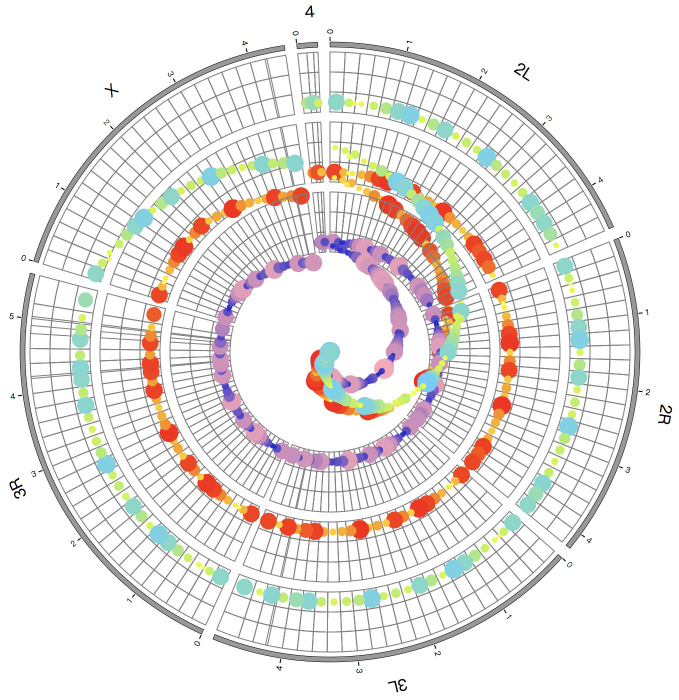
NG-Circos provides SNP, CNV, HEATMAP, LINK, LINE, SCATTER, ARC, TEXT, WIG, LOLLIPOP, GENE, CHORD, AUXILIARYLINE, BUBBLE, HISTGRAM, BACKGROUND, LEGEND, COMPARE and COMBINATION, REDIRECT, DOWNLOAD totally.
Note
NG-Circos itself is not a web application, but a visualization tool that provides the functionality for bioinformatians to build Circos-like figure on bioinformatians’ own web applications. The NG-Circos users are supposed to be familiar with HTML, CSS and JavaScript.
1.2 NG-Circos & Circos
Though NG-Circos shares its name with Circos, NG-Circos is not exactly the same as Circos desktop. NG-Circos is a tool for programmers. It is not an app for end-users, and developers need to write code around NG-Circos to build graphcentric apps. The comparison between NG-Circos and Circos is as follow:
Comparison |
NG-Circos |
Circos |
|---|---|---|
Code |
JavaScript |
Perl |
Users |
For web developers / bioinformatians |
For end-users |
Interactive |
Yes |
No |
Used to |
Build Circos-like web applications / draw figures |
Draw figures |


3. Getting started
Step0. View demos in locale
There is a very easy and quick way to experience the power of NG-Circos. Do it step by step according to the following:
Before using NG-Circos, please read the step-by-step guide for 21 NG-Circos Modules.
All code, demos, input files can be found in NG-Circos project on GitHub.
(a) Tutorials - Step-by-step Guide for 21 Modules in NG-Circos
Download and extract demos file NGCircos_get_start_demo.
Open gwas.html file with your local browser.
(b) NG-Circos get start demos
Download and extract demos file NGCircos_demos.
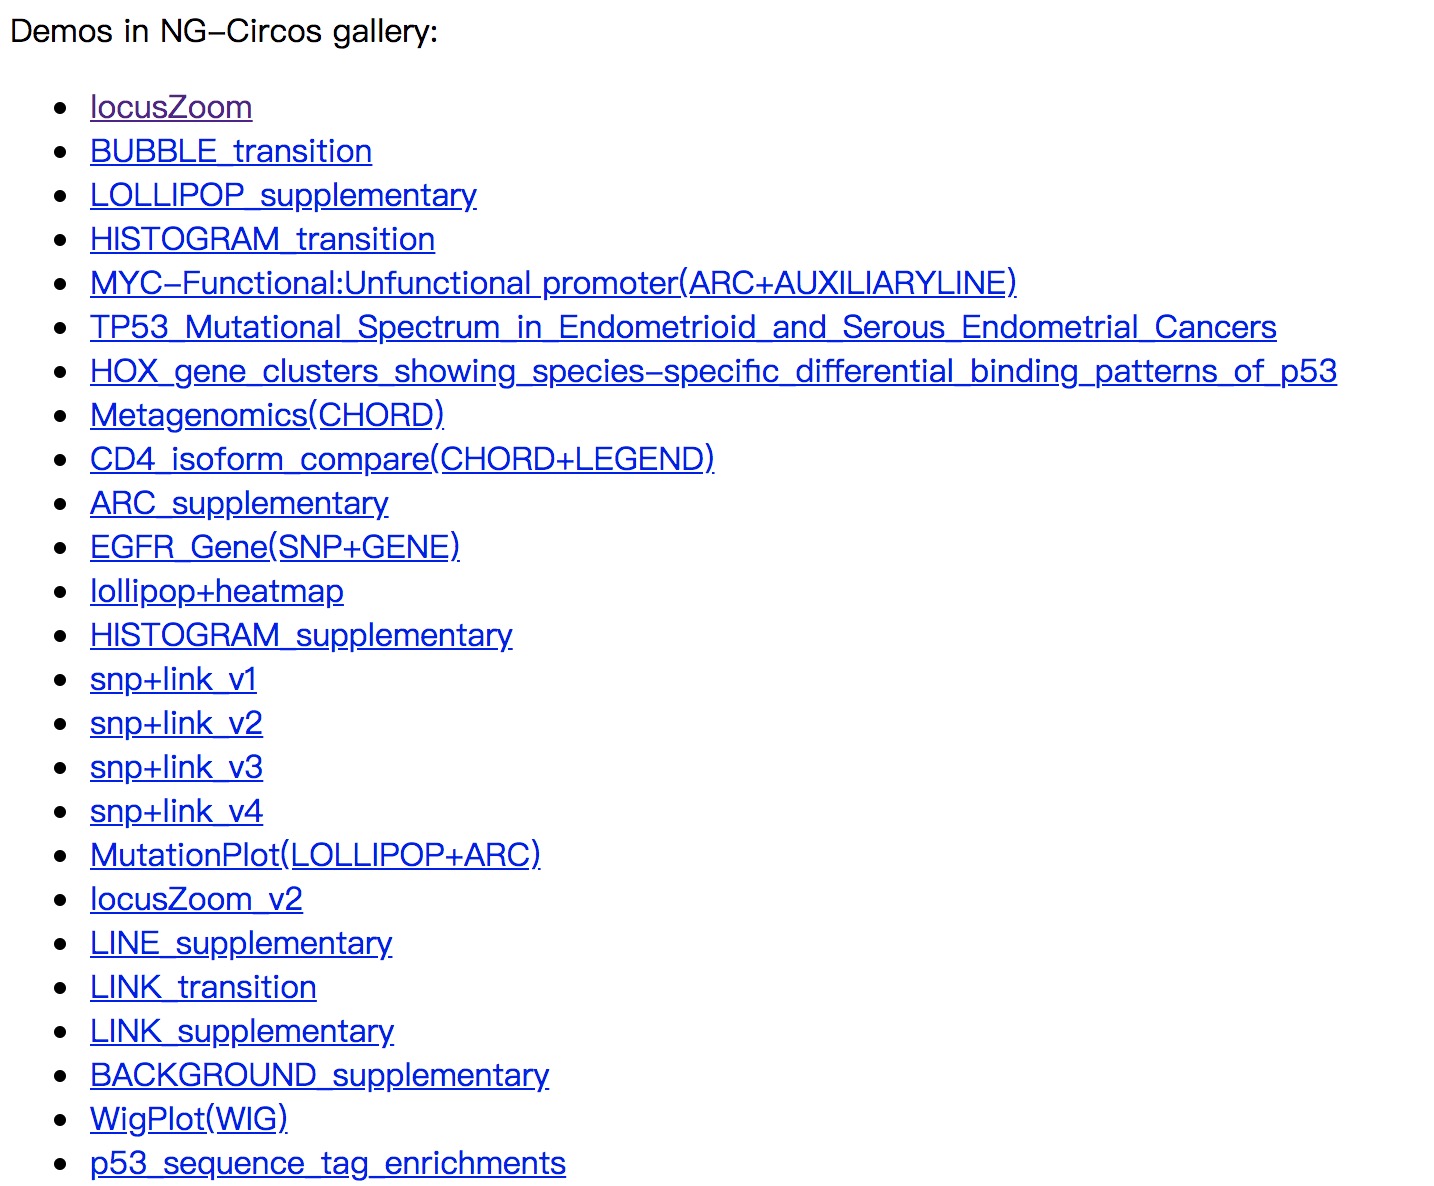
Open index.html file with your local browser. Yes, everything is done! You will see the following. Click on the links, and you can see all of our demos locally.
(c) NG-Circos Other demos
Step1. Including NGCircos.js
This section will familiarise you with the basic steps necessarily to start using NG-Circos. Here we will visualize the GWAS data in GWAS Catalog with NG-Circos step by step.
After Step0, you will have a “get_start_demo” folder. Now create a new file “gwas.html” in “get_start_demo” folder, then include NGCircos.js in a <script> tag. Now, “gwas.html” is as follows:
<!DOCTYPE html>
<html>
<head>
        <meta charset="utf-8">
        <title>NGCircos.js</title>
</head>
<body>
        <!-- NGCircos.js, Jquery.js and D3.js import -->
        <script src="./lib/jquery.js"></script>
        <script src="./lib/d3.js"></script>
        <script src="./lib/NGCircos.js"></script>
</body>
</html>
Note
NG-Circos is based on Jquery.js and D3.js(v3), so they should be included before NGCircos.js. Jquery.js, D3.js and NGCircos.js can be found in the lib folder of get_start_demo.
Step2. <div> tag to set picture position in html
After Step1, prepare a <div> tag with “NG-Circos” id to set the picture position you will draw in html. Now, “gwas.html” is as follows:
<!DOCTYPE html>
<html>
<head>
        <meta charset="utf-8">
        <title>NGCircos.js</title>
</head>
<body>
        <!-- NGCircos.js, Jquery.js and D3.js import -->
        <script src="./lib/jquery.js"></script>
        <script src="./lib/d3.js"></script>
        <script src="./lib/NGCircos.js"></script>
        <!-- Prepare a <div> tag with "NGCircos" id to set the picture position your will draw in html -->
        <div id="NGCircos"></div>
</body>
</html>
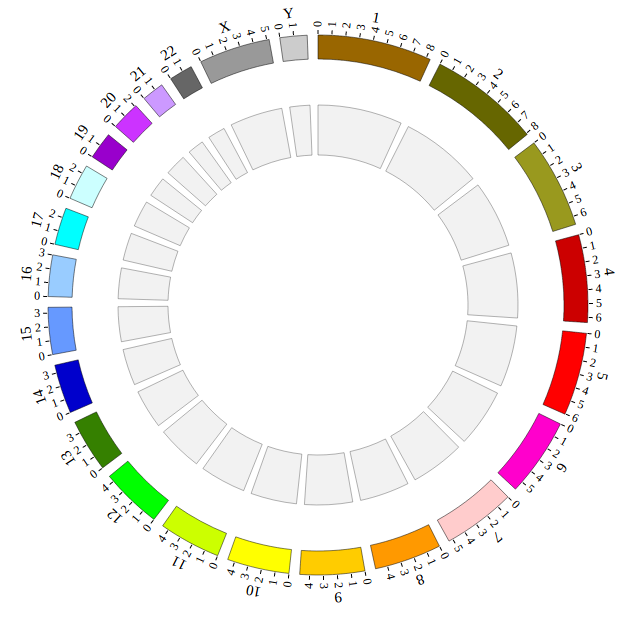
Step3. Genome configuration
“Genome configuration” defines the number and size of chromosomes.
After Step2, We will configure “Genome configuration”. Genome configuration is set in a <script> tag. Here we configure the most used human genome - hg19, its data tag are defined as NGCircosGenome. Now, “gwas.html” is as follows:
 <!DOCTYPE html>
 <html>
     <head>
         <meta charset="utf-8">
         <title>NGCircos.js</title>
     </head>
     <body>
         <!-- NGCircos.js, Jquery.js and D3.js import -->
         <script src="./lib/jquery.js"></script>
         <script src="./lib/d3.js"></script>
         <script src="./lib/NGCircos.js"></script>
         <!-- Prepare a <div> tag with "NGCircos" id to set the picture position your will draw in html -->
         <div id="NGCircos"></div>
 <!-- Genome configuration -->
 <script>
   var NGCircosGenome = [   // human hg19, data tag is NGCircosGenome
     [
 ["1" , 249250621],
      ["2" , 243199373],
      ["3" , 198022430],
      ["4" , 191154276],
      ["5" , 180915260],
      ["6" , 171115067],
      ["7" , 159138663],
      ["8" , 146364022],
      ["9" , 141213431],
      ["10" , 135534747],
      ["11" , 135006516],
      ["12" , 133851895],
      ["13" , 115169878],
      ["14" , 107349540],
      ["15" , 102531392],
      ["16" , 90354753],
      ["17" , 81195210],
      ["18" , 78077248],
      ["19" , 59128983],
      ["20" , 63025520],
      ["21" , 48129895],
      ["22" , 51304566],
      ["X" , 155270560],
      ["Y" , 59373566]
]
   ];
 </script>
     </body>
 </html>
Note
Here we configure hg19 human genome with data tag as NGCircosGenome.
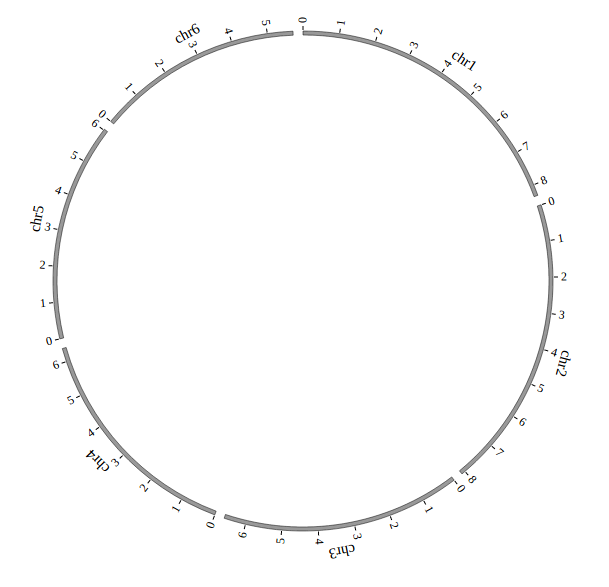
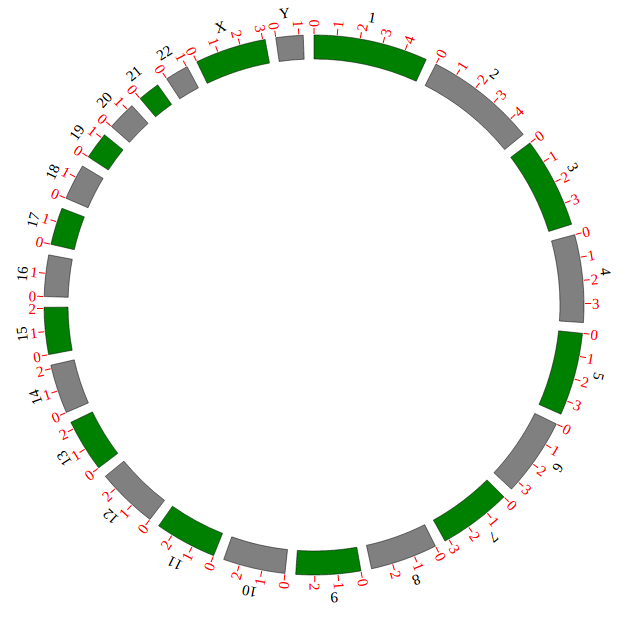
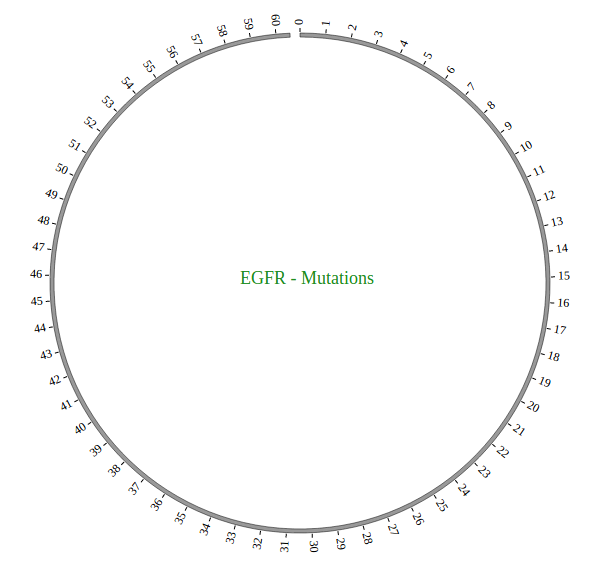
Step 3.1 Customize your genome configuration
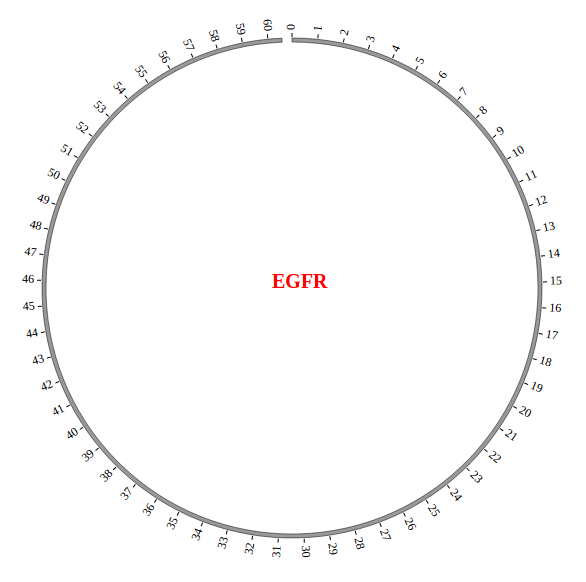
Genome configuration is set in a <script> tag. Here we configure a genome with 1,2,3,X,Y chromosome.
    var NGCircosGenome = [       // Configure your own genome here.
[
       ["1" , 247249719],
       ["2" , 242951149],
       ["3" , 199501827],
       ["X" , 154913754],
       ["Y" , 57772954]
]
    ];
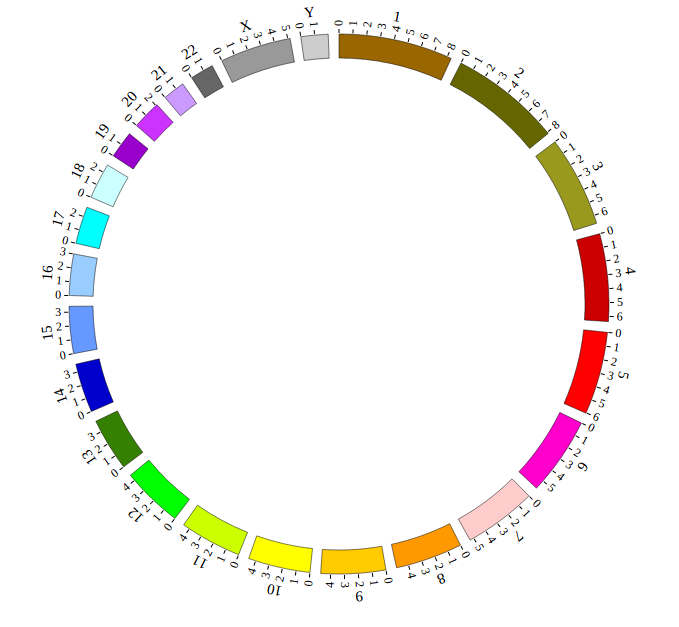
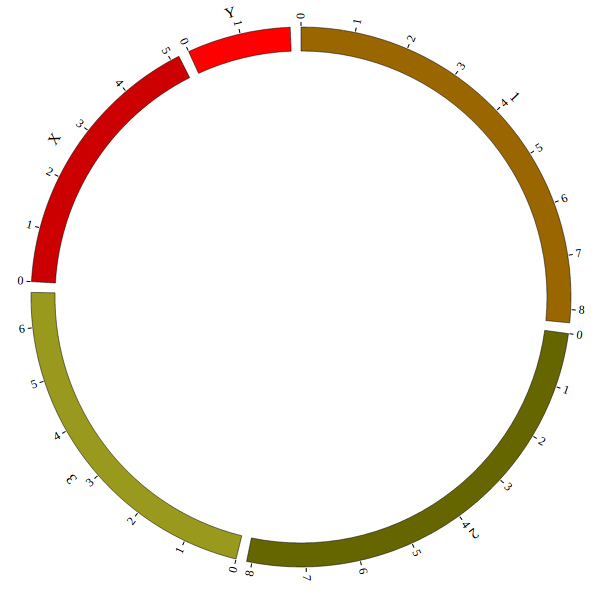
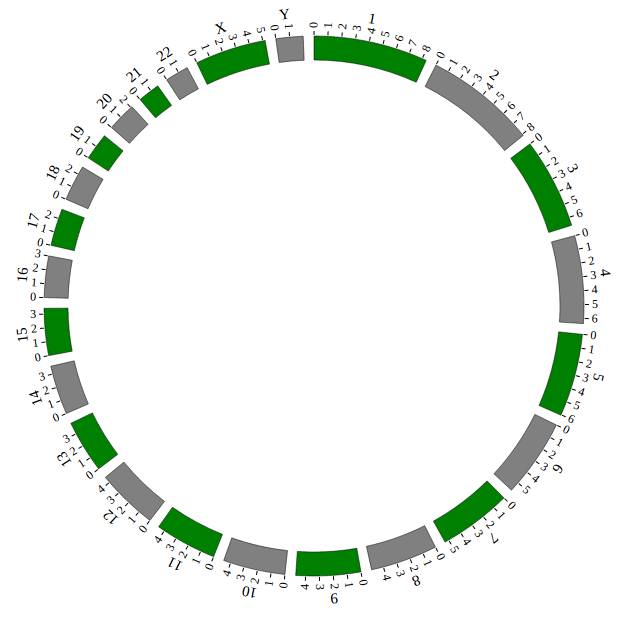
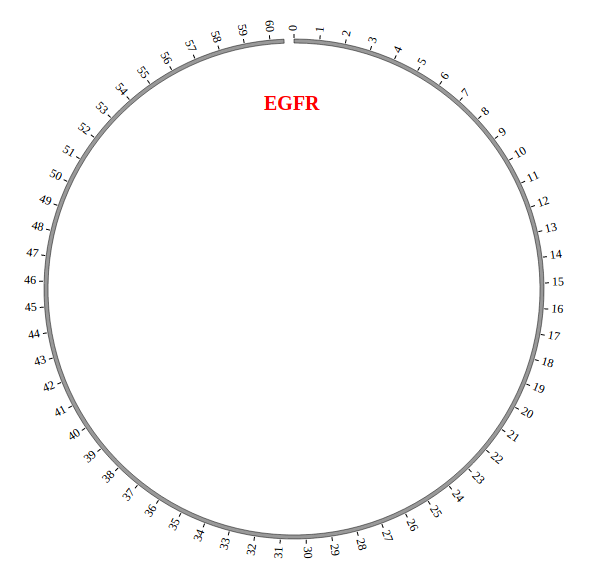
Example: add chromosome
Example |
Before |
After |
|---|---|---|
Code change |
 var NGCircosGenome = [
[
    ["1" , 247249719],
    ["2" , 242951149],
    ["3" , 199501827],
    ["X" , 154913754],
    ["Y" , 57772954]
]
 ];
|
 var NGCircosGenome = [
[
    ["1" , 247249719],
    ["2" , 242951149],
    ["3" , 199501827],
      ["4" , 191154276],
      ["5" , 180915260],
      ["6" , 171115067],
      ["7" , 159138663],
    ["X" , 154913754],
    ["Y" , 57772954]
]
 ];
|
Image change |
|
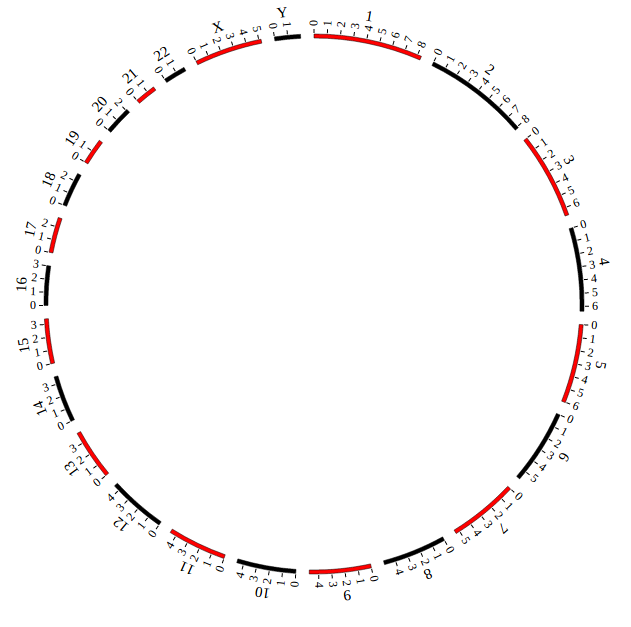
|
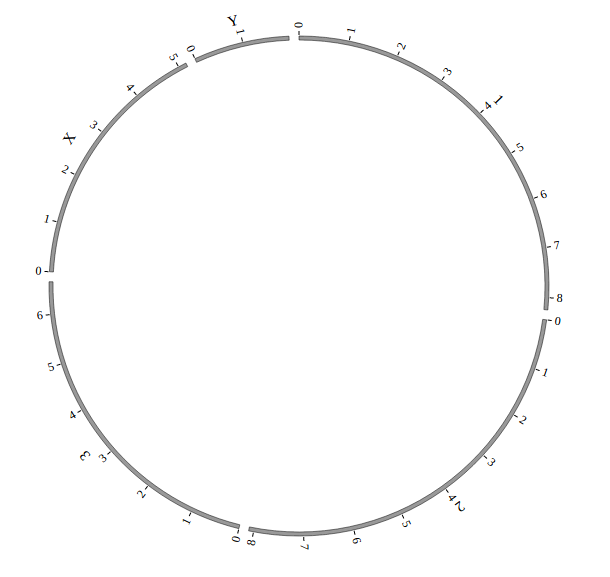
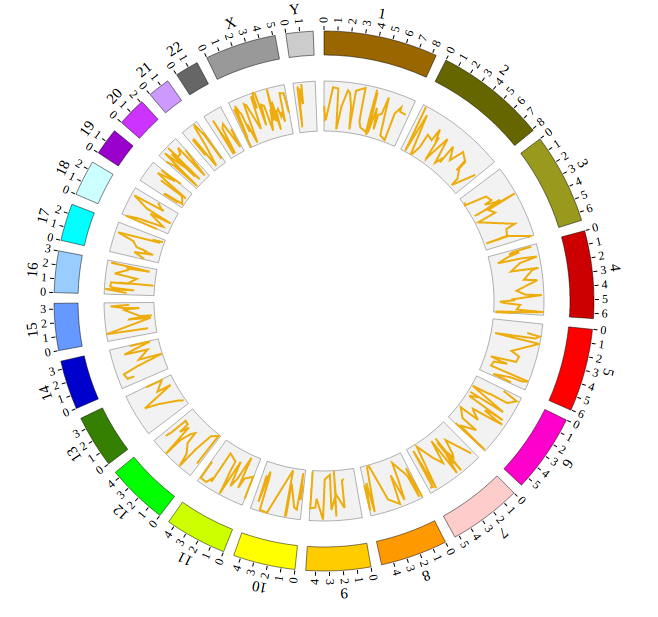
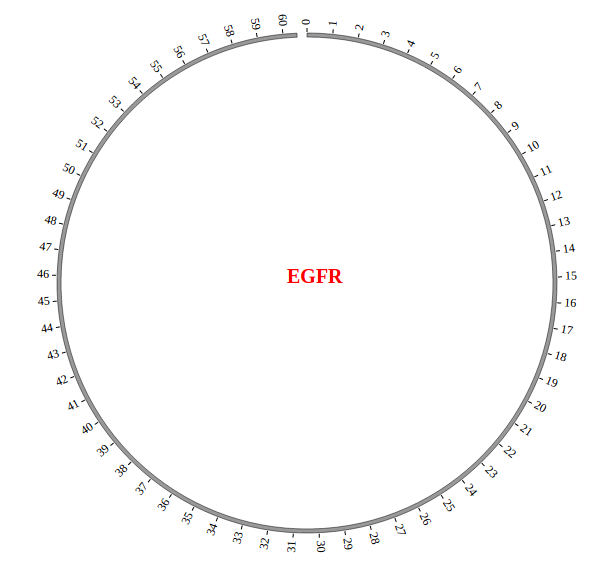
Step 3.2 Example: Customize your genome by Main configuration
   <script>
     var NGCircosGenome = [      // Configure your own genome here.
 [
        ["1" , 247249719],
        ["2" , 242951149],
        ["3" , 199501827],
        ["X" , 154913754],
        ["Y" , 57772954]
 ]
     ];
     NGCircos01 = new NGCircos(NGCircosGenome,{       // Initialize NG-Circos with "NGCircosGenome" and Main configuration
        target : "example",                              // Main configuration "target"
        svgWidth : 900,                                  // Main configuration "svgWidth"
        svgHeight : 600,                                 // Main configuration "svgHeight"
        innerRadius: 246,                                // Main configuration "innerRadius"
        outerRadius: 250,                                // Main configuration "outerRadius"
        genomeFillColor: ["#999999"]                     // Main configuration "genomeFillColor"
     });
     NGCircos01.draw_genome(NGCircos01.genomeLength);  // NG-Circos callback
NGCircos01.draw_genome(NGCircos01.genomeLength2); // NG-Circos callback second time
   </script>
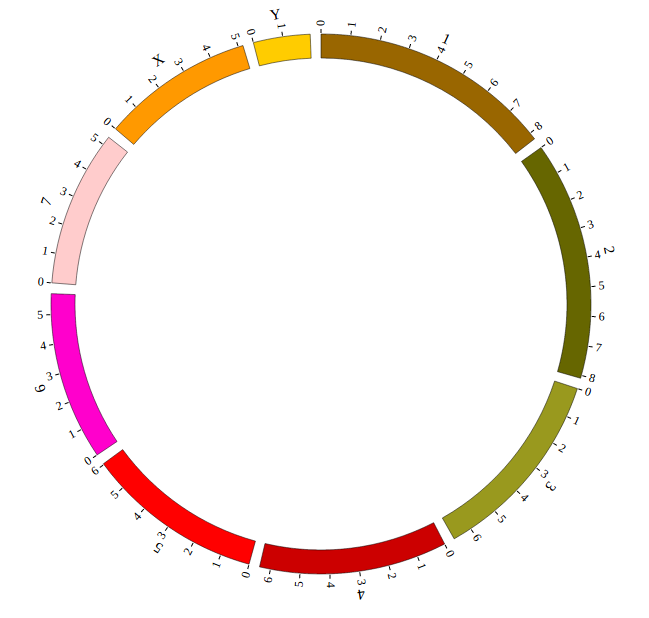
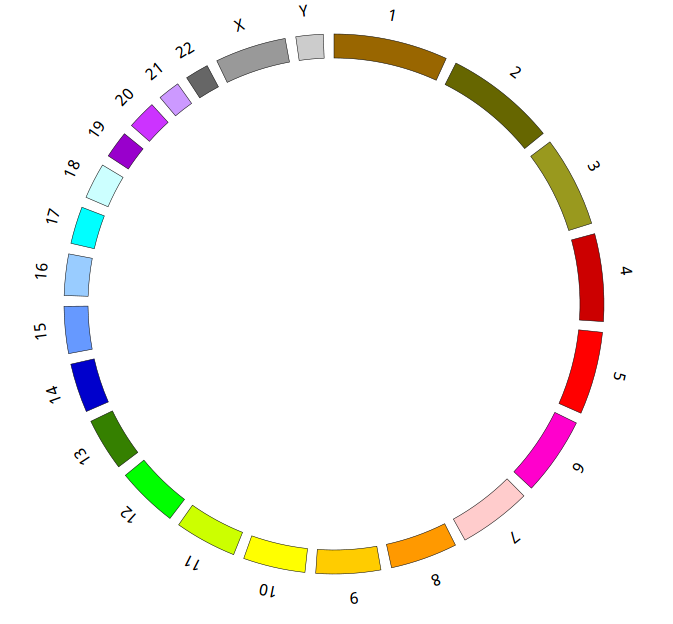
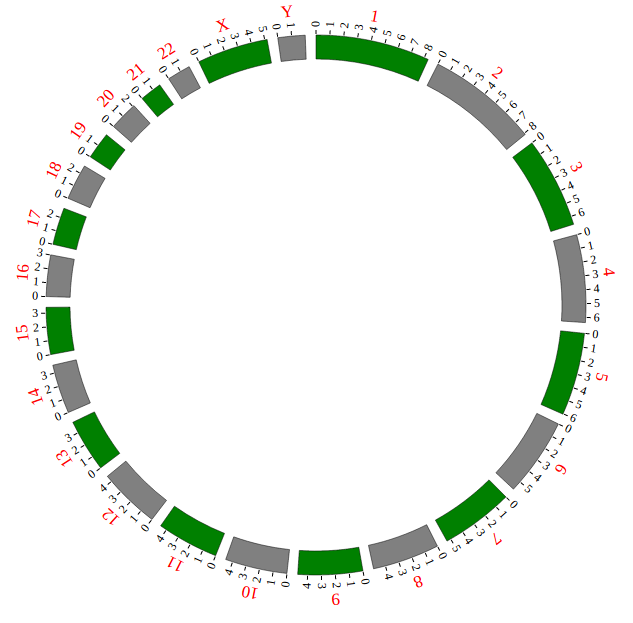
Step 3.3 Example: Human genome (hg19)
<script>
  var NGCircosGenome = [  //human hg19
[
       ["1" , 249250621],
       ["2" , 243199373],
       ["3" , 198022430],
       ["4" , 191154276],
       ["5" , 180915260],
       ["6" , 171115067],
       ["7" , 159138663],
       ["8" , 146364022],
       ["9" , 141213431],
       ["10" , 135534747],
       ["11" , 135006516],
       ["12" , 133851895],
       ["13" , 115169878],
       ["14" , 107349540],
       ["15" , 102531392],
       ["16" , 90354753],
       ["17" , 81195210],
       ["18" , 78077248],
       ["19" , 59128983],
       ["20" , 63025520],
       ["21" , 48129895],
       ["22" , 51304566],
       ["X" , 155270560],
       ["Y" , 59373566]
]
  ];
</script>
Step4. Initialization and Main configuration
“Main configuration” is the main configuration file of NG-Circos and mainly divided into four classes: “Customize SVG”, “Customize genome”, “Customize Events” and “Customize Tooltips”.
After Step3, We will initialize NG-Circos and configure “Main configuration”. Here are three changes:
Initialize NG-Circos
All of the data tags that is defined in “Genome configuration” and “Data configuration” must be initialized here. We initialize data tag - NGCircosGenome as below:
NGCircos01 = new NGCircos(NGCircosGenome,{
Danger
All of the data tags that is defined in “Genome configuration” and “Data configuration” must be initialized here.
Main configuration
Here we configure 7 attributes in “Main configuration”, other attributes are used their default values. More attributes can be found in “Main configuration” part of this document.
Main configuration |
Default value |
Class |
Description |
|---|---|---|---|
|
“NGCircos” |
Customize SVG |
SVG position in html, where <div> id is “NGCircos” |
|
900 |
Customize SVG |
SVG width |
|
600 |
Customize SVG |
SVG height |
|
NGCircos |
Customize genome |
class name of SVG |
|
0.04 |
Customize genome |
distance between chromosomes |
|
246 |
Customize genome |
inner radius of chromosome |
|
270 |
Customize genome |
outer radius of chromosome |
NG-Circos callback
Callback is necessary, Cause we add a compare module for NG-Circos, users need to call back twice, but it is usually the same, so don’t need to be too concerned about it.
Now, “gwas.html” is as follows:
   <!DOCTYPE html>
   <html>
       <head>
           <meta charset="utf-8">
           <title>NGCircos.js</title>
       </head>
       <body>
           <!-- NGCircos.js, Jquery.js and D3.js import -->
           <script src="./lib/jquery.js"></script>
           <script src="./lib/d3.js"></script>
           <script src="./lib/NGCircos.js"></script>
           <!-- Prepare a <div> tag with "NGCircos" id to set the picture position your will draw in html -->
           <div id="NGCircos"></div>
   <!-- Genome configuration -->
   <script>
     var NGCircosGenome = [
 [
        ["1" , 249250621],
        ["2" , 243199373],
        ["3" , 198022430],
        ["4" , 191154276],
        ["5" , 180915260],
        ["6" , 171115067],
        ["7" , 159138663],
        ["8" , 146364022],
        ["9" , 141213431],
        ["10" , 135534747],
        ["11" , 135006516],
        ["12" , 133851895],
        ["13" , 115169878],
        ["14" , 107349540],
        ["15" , 102531392],
        ["16" , 90354753],
        ["17" , 81195210],
        ["18" , 78077248],
        ["19" , 59128983],
        ["20" , 63025520],
        ["21" , 48129895],
        ["22" , 51304566],
        ["X" , 155270560],
        ["Y" , 59373566]
 ]
     ];
     NGCircos01 = new NGCircos(NGCircosGenome,{  // Initialize NG-Circos with "NGCircosGenome" and Main configuration
     //Main configuration
        target : "NGCircos",                       // Main configuration "target"
        svgWidth : 900,                             // Main configuration "svgWidth"
        svgHeight : 600,                            // Main configuration "svgHeight"
   svgClassName: "NGCircos",                  // Main configuration "svgClassName"
        chrPad : 0.04,                              // Main configuration "chrPad"
        innerRadius: 246,                           // Main configuration "innerRadius"
        outerRadius: 270,                           // Main configuration "outerRadius"
     });
     NGCircos01.draw_genome(NGCircos01.genomeLength); // NG-Circos callback
NGCircos01.draw_genome(NGCircos01.genomeLength2); // NG-Circos callback second time
   </script>
       </body>
   </html>
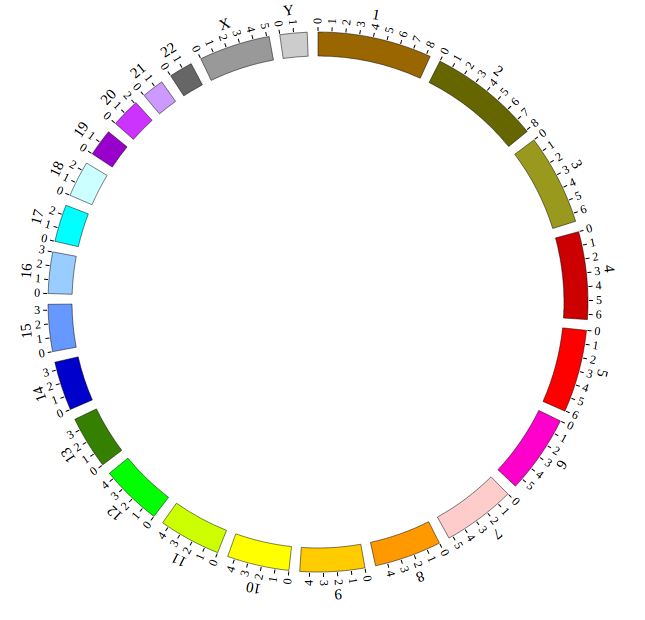
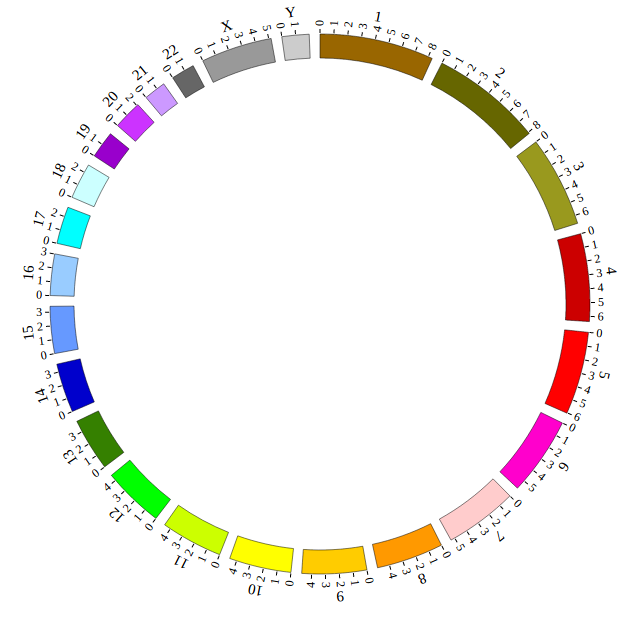
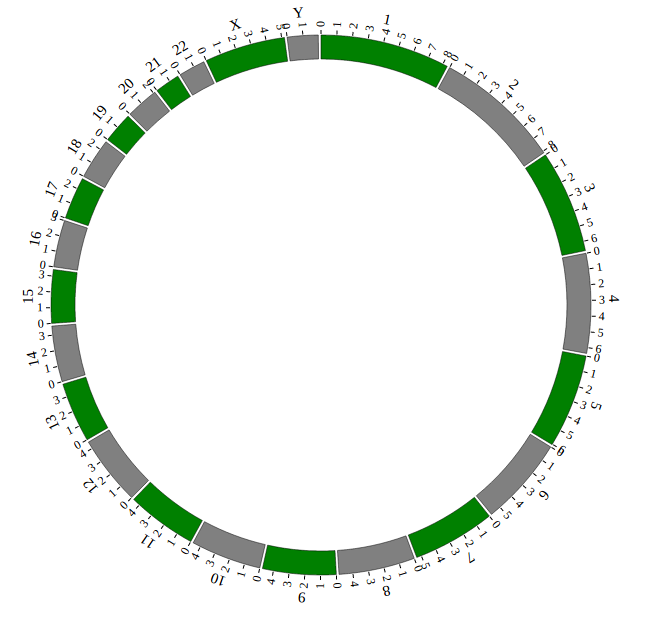
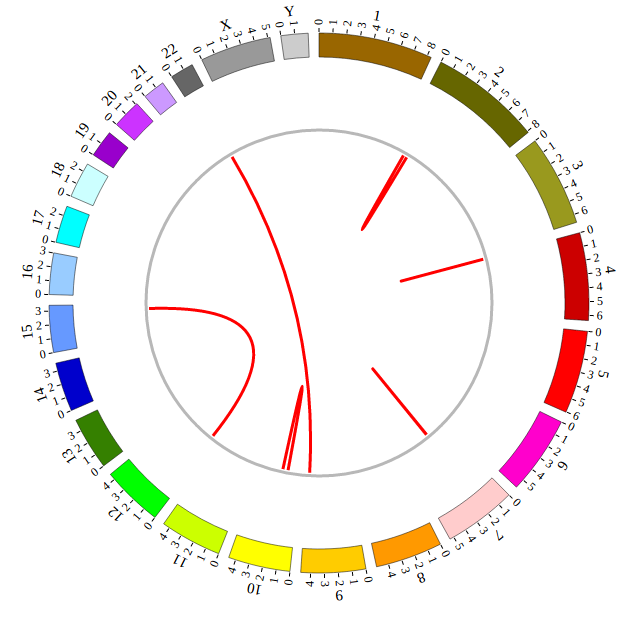
Great! You have drawn a simple genome! Is it so easy? Open “gwas.html” file with your local browser and view it as below:
Step5. Add Data configuration
Please read the step-by-step input data guide for 21 NG-Circos Modules first.
“Data configuration” is designed for “Function Modules” in NG-Circos. According to “Function Modules” division, “Data configuration” includes the parts below:
Data Configuration Class |
For Biological Data |
Need “Data Preparation Tools” |
|---|---|---|
SNP module |
SNP with value; GWAS data… |
Yes |
SCATTER module |
SNP without value; Genes data… |
Yes |
LINK module |
Gene fusions; Interaction; SV… |
Yes |
CNV module |
CNV with value… |
Yes |
ARC module |
CNV without value; Gene domain; Chromosome band… |
Yes |
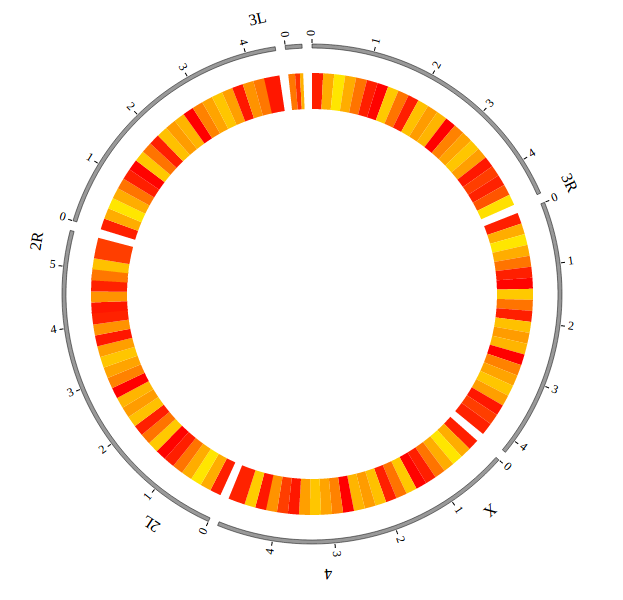
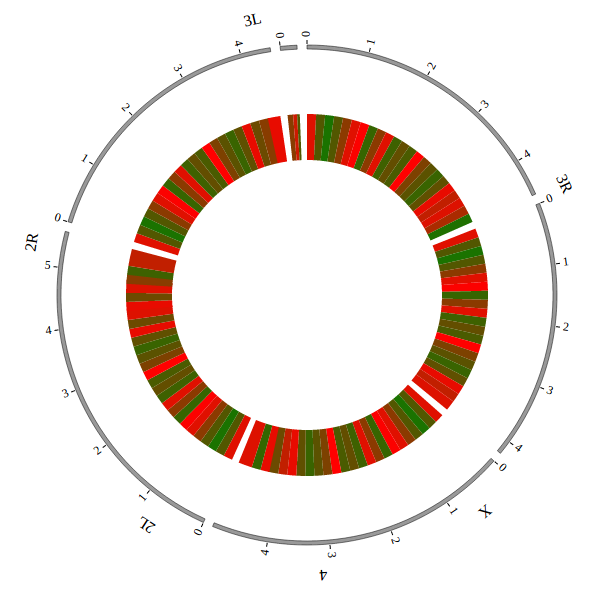
HEATMAP module |
Gene expression… |
Yes |
BUBBLE module |
Gene expression and classification… |
Yes |
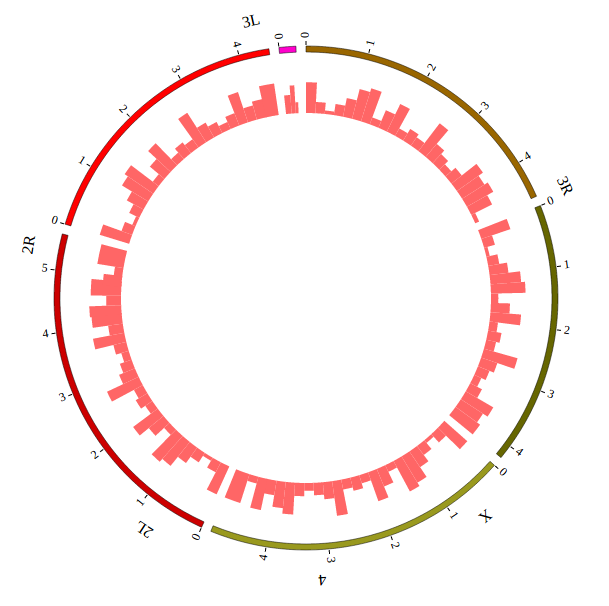
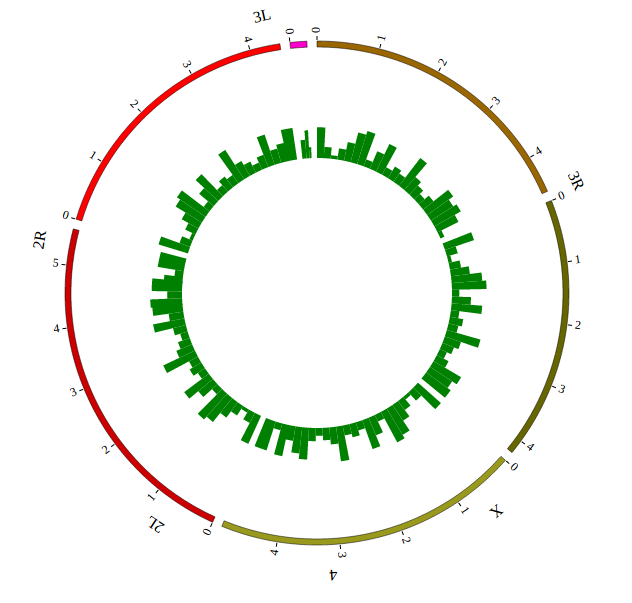
HISTOGRAM module |
Gene expression… |
Yes |
LINE module |
Gene expression… |
Yes |
BACKGROUND module |
Display background and axis circles |
No |
TEXT module |
Assigning annotation text |
No |
WIG module |
.wig file;Read depth; Gene expression… |
Yes |
LOLLIPOP module |
Muation… |
Yes |
GENE module |
Gene profile… |
Yes |
CHORD module |
Relationship between gene, exon, protein… |
Yes |
REDIRECT module |
Redirect from module to image, website… |
No |
DOWNLOAD module |
Download as SVG, PNG |
No |
AUXILIARYLINE module |
Curve, broken, straight line with 4 kinds of marker |
No |
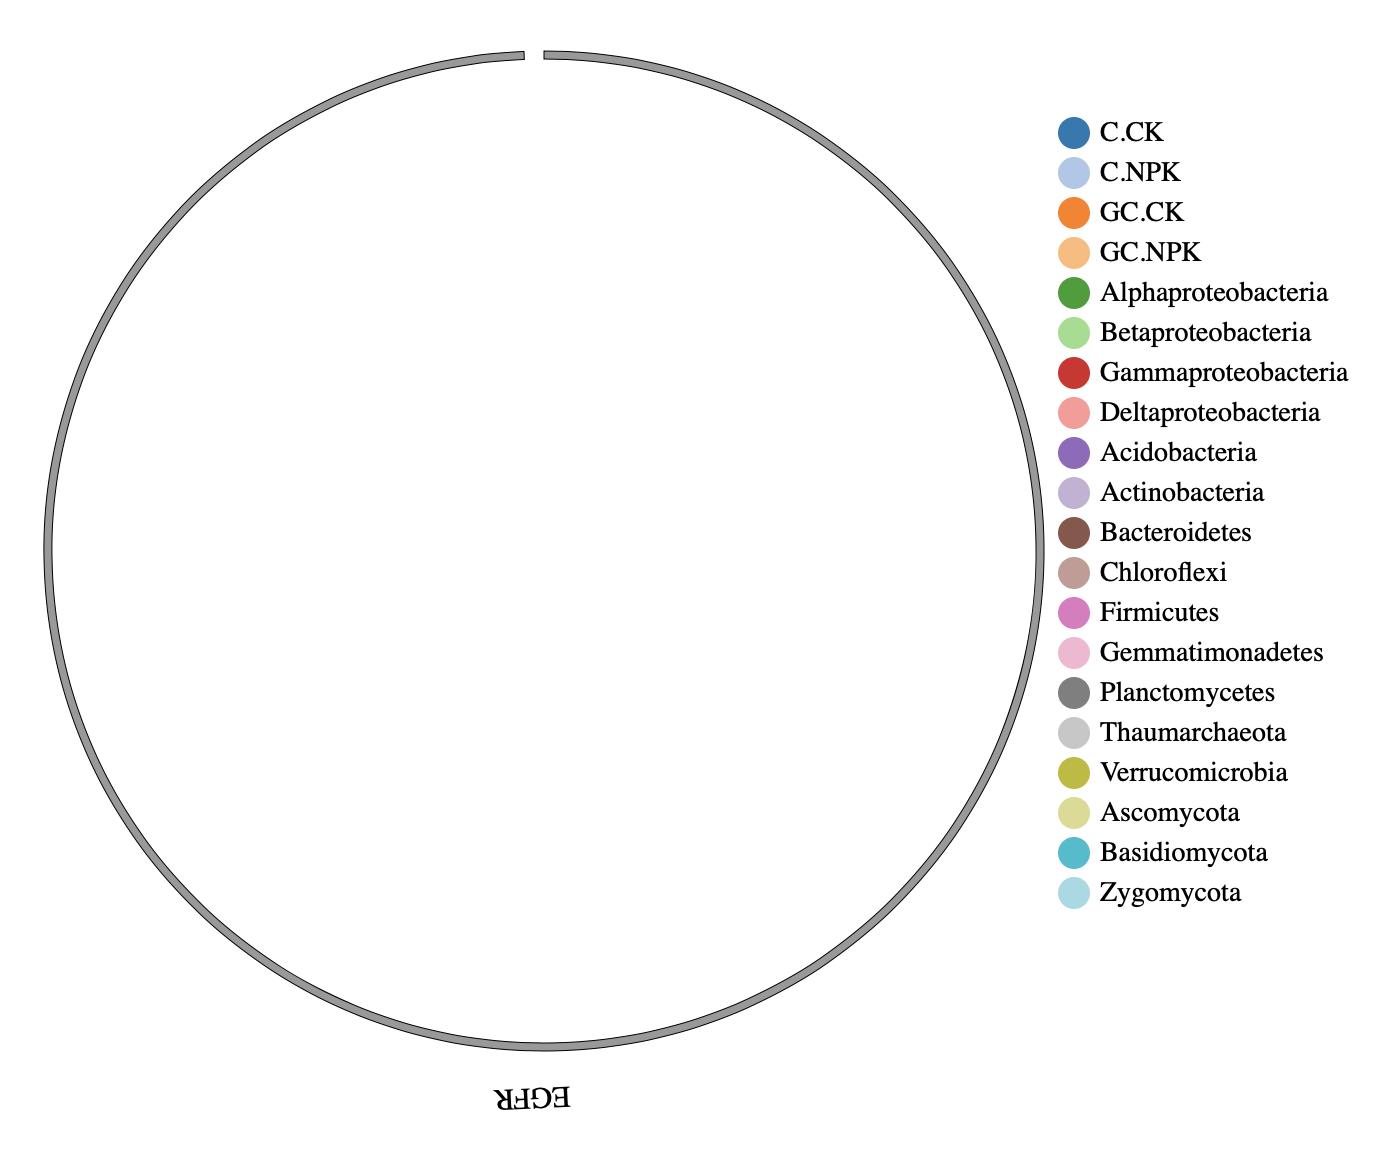
LEGEND module |
Customize legend in circle, line, rectangle |
No |
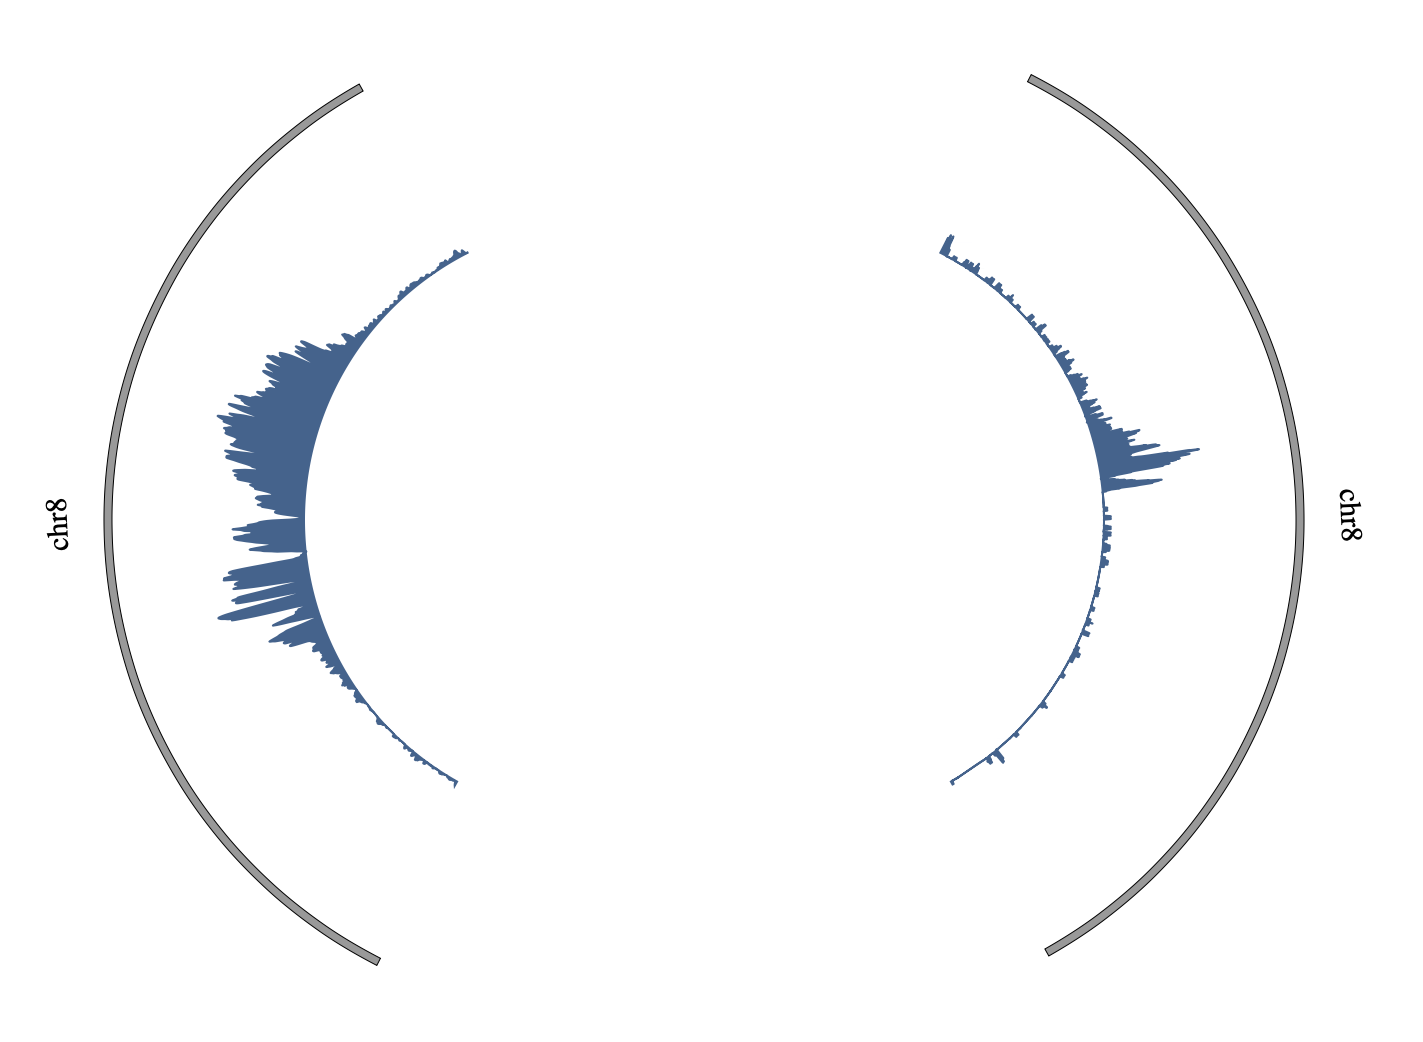
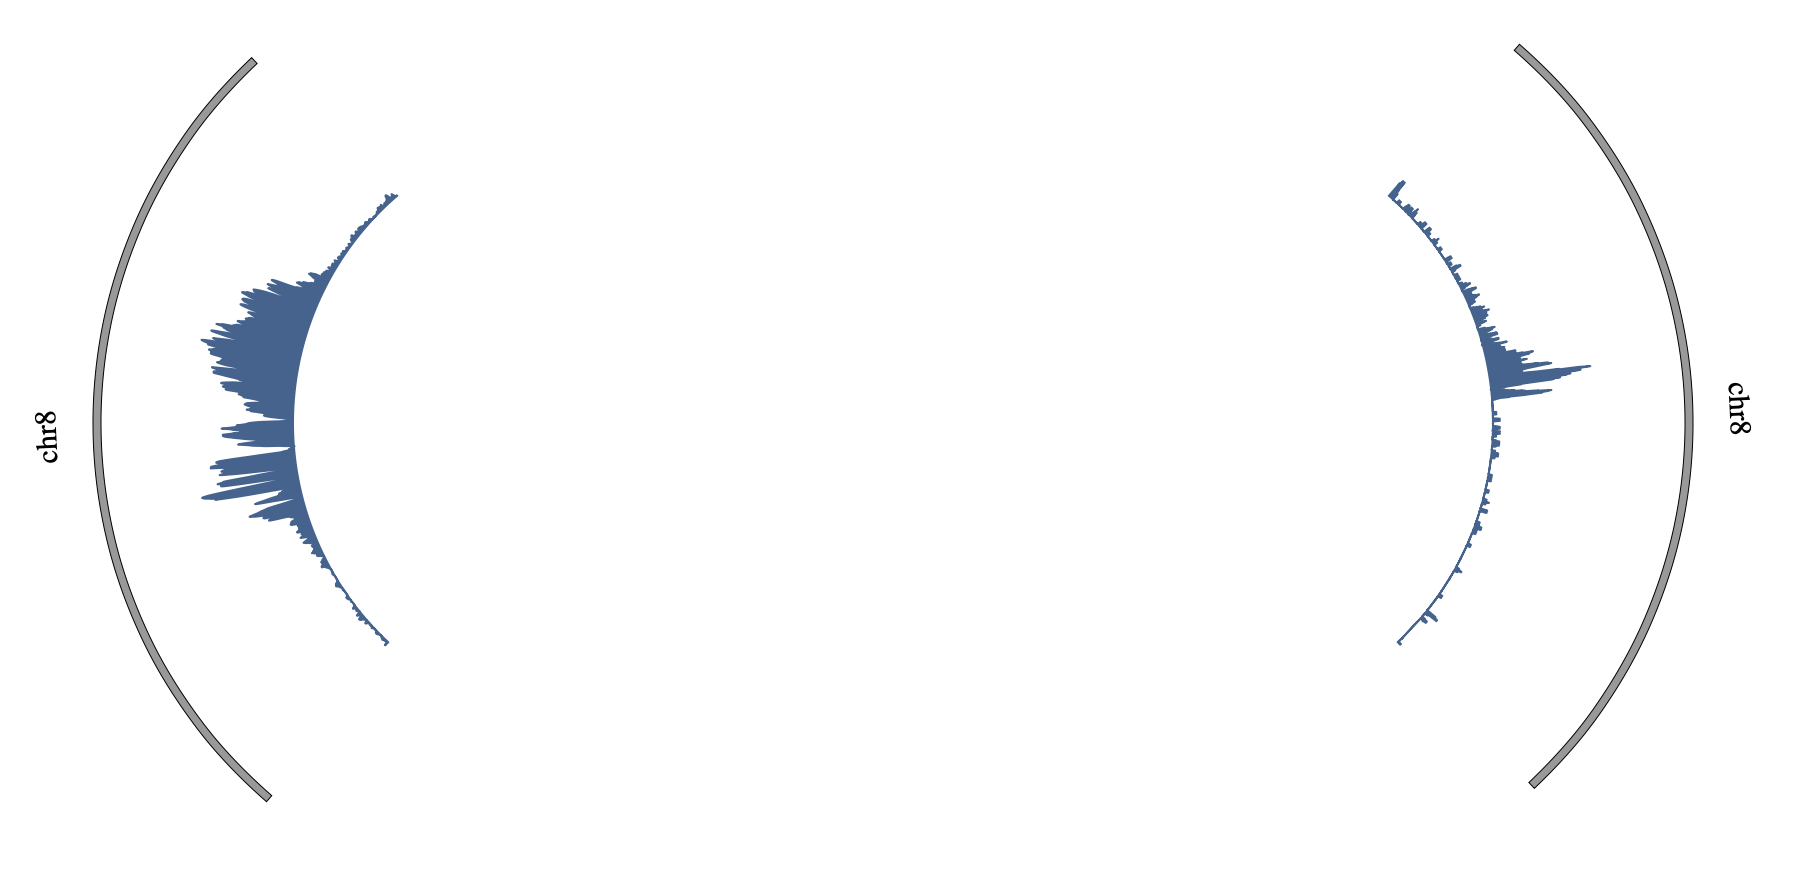
COMPARE module |
Advanced module, display two comparable datasets in circle… |
No |
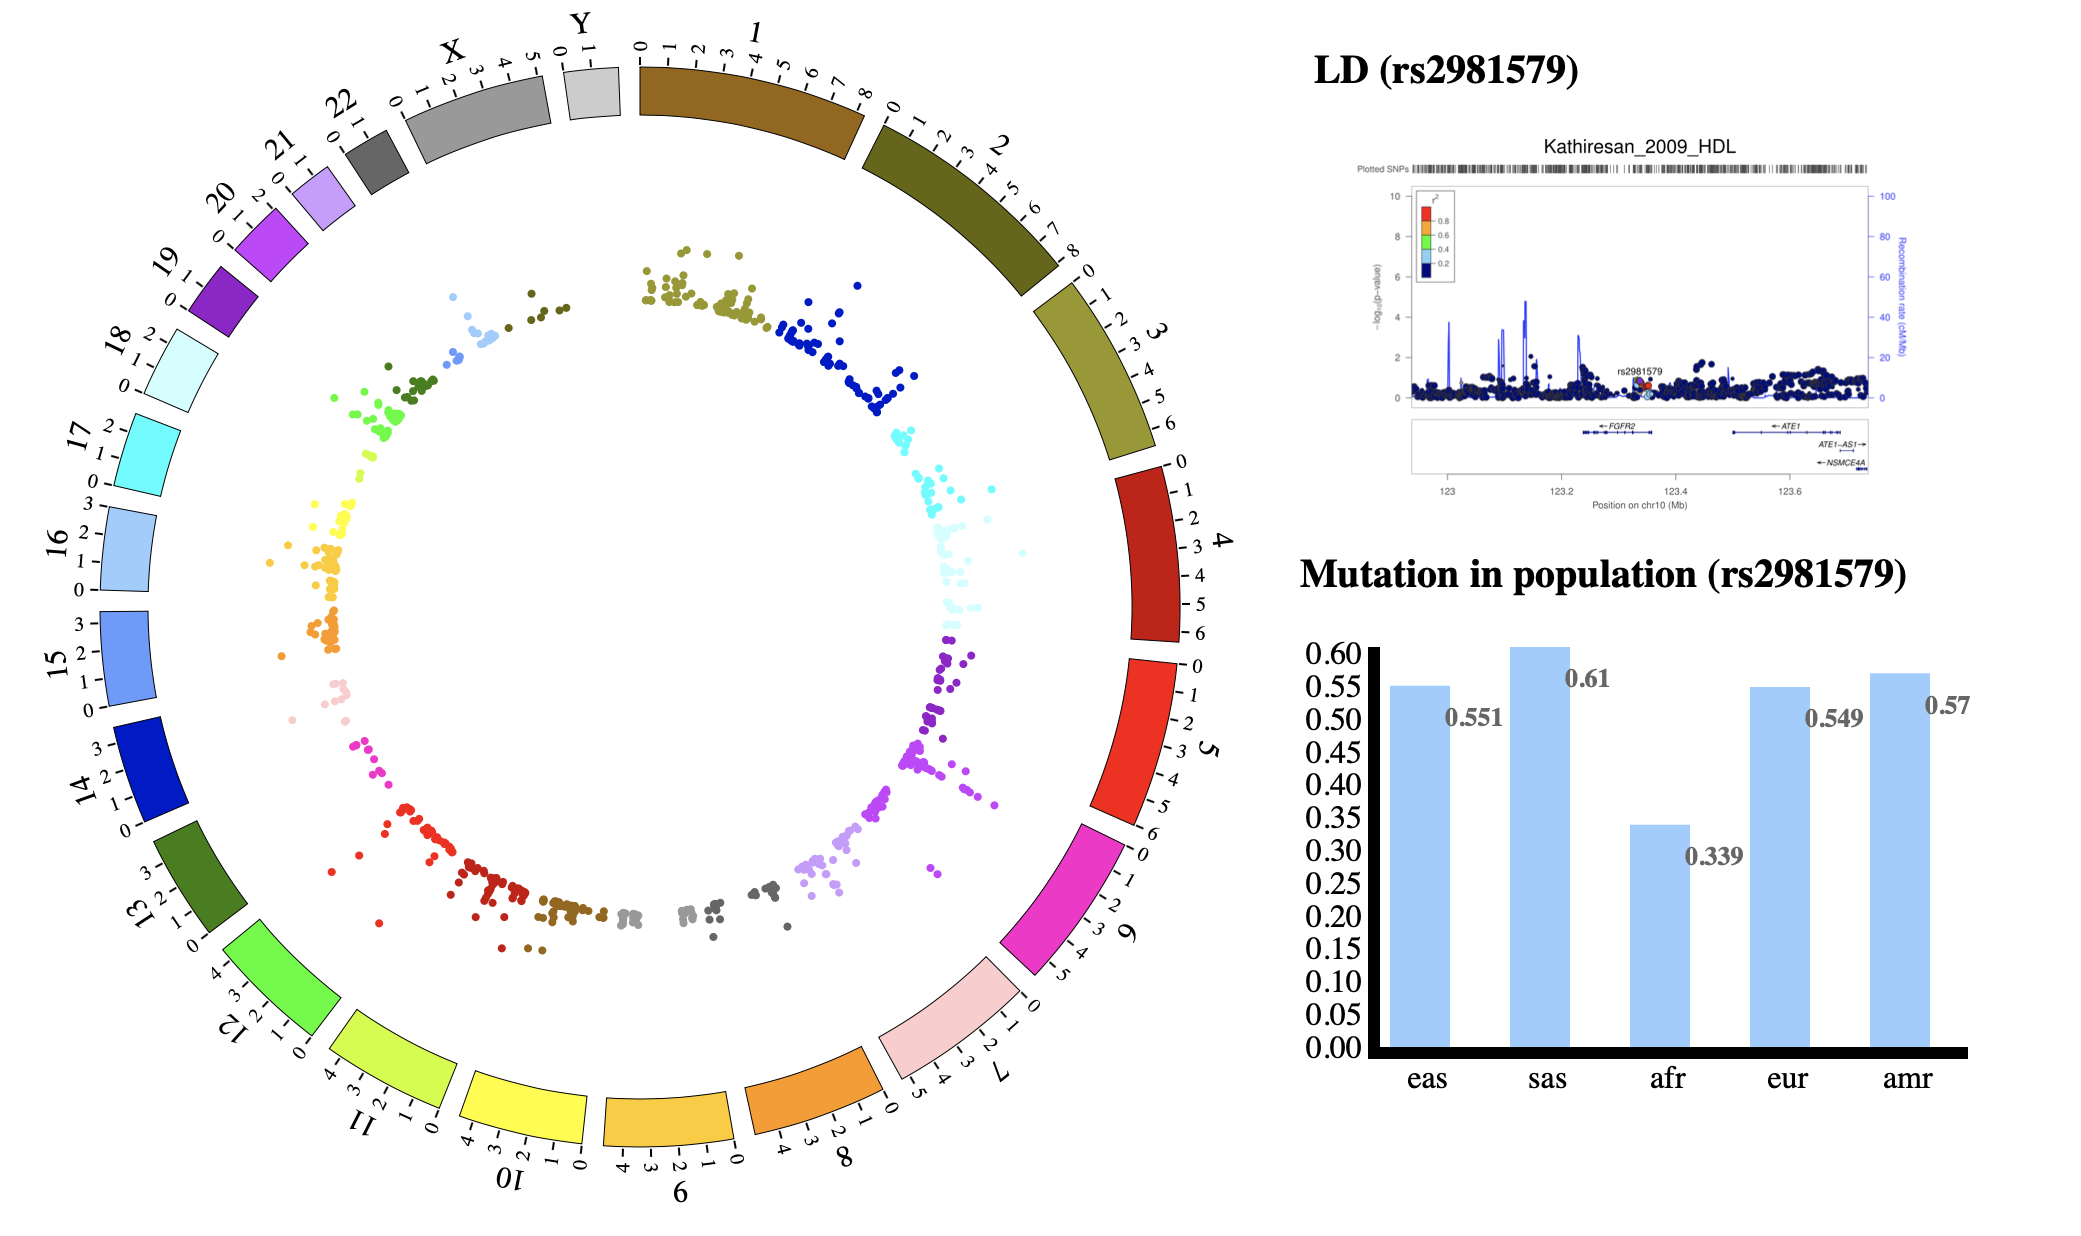
COMBINATION module |
Advanced module, display more biology details with mouse event… |
No |
We have provided “Data Preparation Tools” to prepare the data for almost all “Function Modules” except 6 auxiliary modules(BAKCGROUND, TEXT, REDIRECT, DOWNLOAD, AUXILIARYLINE, LEGEND, and 2 advanced modules(COMPARE COMBINATION),which don’t require a data input.
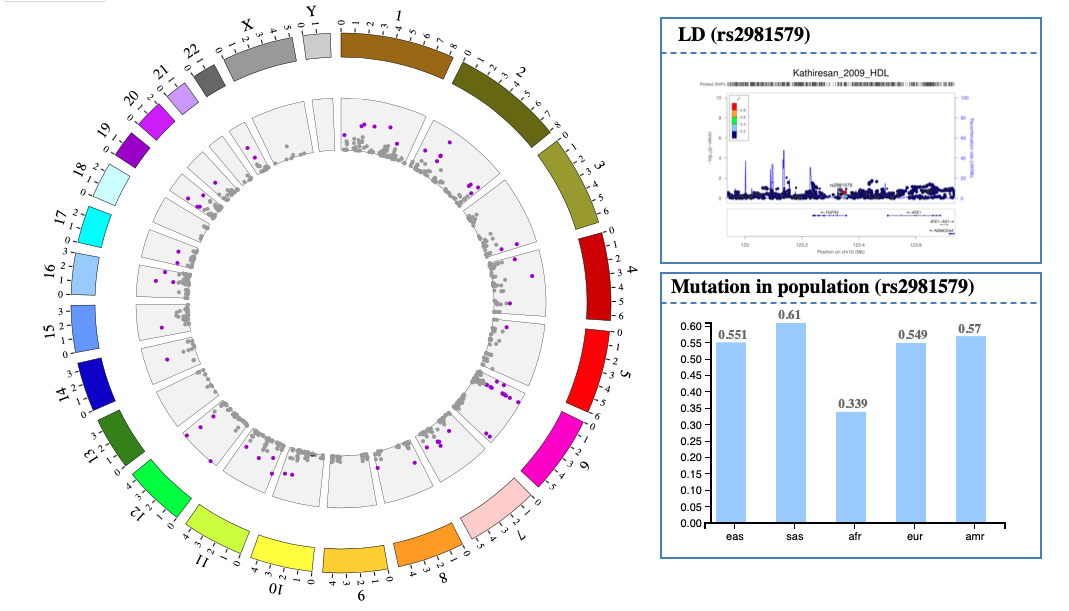
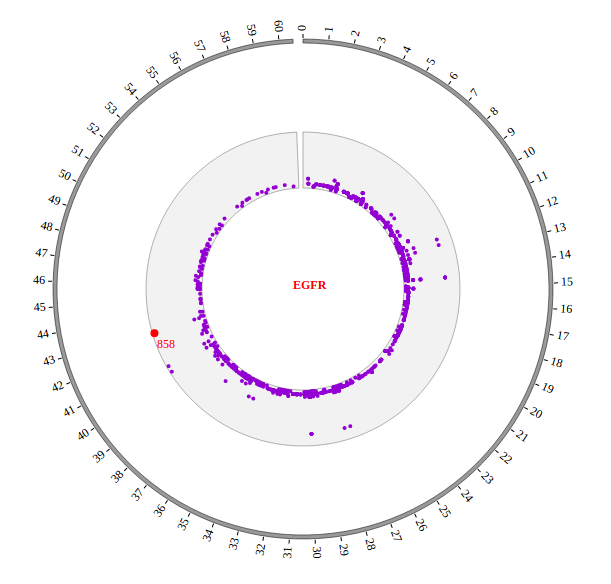
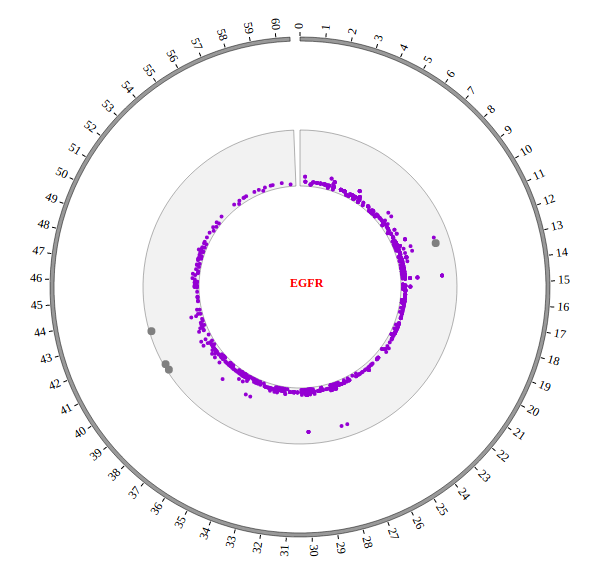
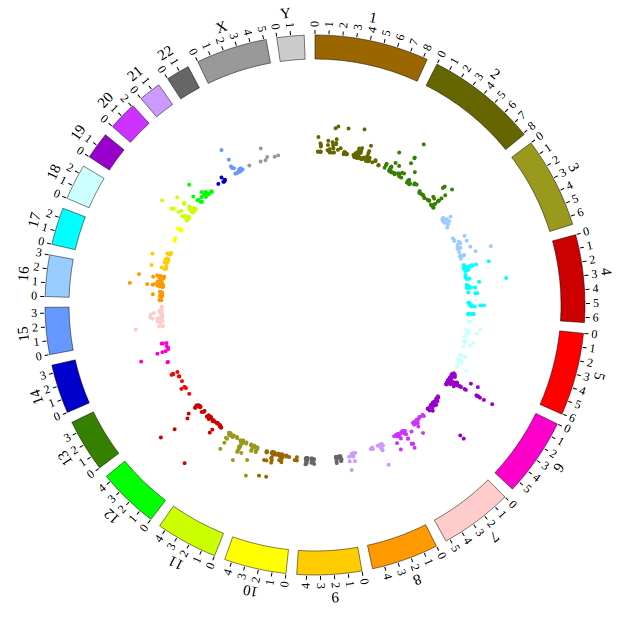
Step5.1 Display GWAS data using SNP module
Input GWAS data
We download GWAS data from GWAS Catalog. Then we filtered the data and just left the items which their P-value less than 1E-18. We saved the data in SNP04_gwascatalog.txt, as below:
10      100315722       20.2218 rs603424
10      101219450       19      rs11190870
10      103086421       25.1549 rs11191548
10      112998590       74.0969 rs7903146
......
X       5266661 24.699  rs6638512
X       67343176        90.699  rs2497938
X       69578860        18.1549 rs11796357
X       79241621        32.699  rs5912838
The first column is the name of the chromosome.
The second column is the position of the SNP
The third column is the value of -log10(P-value)
The fourth column is the dbSNP id
Use “Data Preparation Tools” to prepare data
Note
You need to install the python 3, before running NGCircos_PrepareData.py. You can skip this step, just download SNP04_gwascatalog.js for the next step.
We provide a python program NGCircos_PrepareData.py to help users prepare the input data for each module of NG-Circos
python NGCircos_PrepareData.py SNP SNP04_gwascatalog.txt > SNP04_gwascatalog.js
Move SNP04_gwascatalog.js to ./NGCircos_demos/data/get_started_gwas/ in your local.
Output GWAS data used in NG-Circos
var SNP04_gwascatalog = [ "SNP04_gwascatalog" , {
  maxRadius: 205,
  minRadius: 153,
  SNPFillColor: "#9400D3",
  PointType: "circle",
  circleSize: 2,
  rectWidth: 2,
  rectHeight: 2
} , [
  {chr: "10", pos: "100315722", value: "20.2218", des: "rs603424", color: "rgb(153,102,0)"},
  {chr: "10", pos: "101219450", value: "19", des: "rs11190870", color: "rgb(153,102,0)"},
  {chr: "10", pos: "103086421", value: "25.1549", des: "rs11191548", color: "rgb(153,102,0)"},
  {chr: "10", pos: "112998590", value: "74.0969", des: "rs7903146", color: "rgb(153,102,0)"},
  ......
  {chr: "X", pos: "5266661", value: "24.699", des: "rs6638512", color: "rgb(153,153,153)"},
  {chr: "X", pos: "67343176", value: "90.699", des: "rs2497938", color: "rgb(153,153,153)"},
  {chr: "X", pos: "69578860", value: "18.1549", des: "rs11796357", color: "rgb(153,153,153)"},
  {chr: "X", pos: "79241621", value: "32.699", des: "rs5912838", color: "rgb(153,153,153)"},
]];
Including GWAS data SNP04_gwascatalog.js
Use <script> tag to include GWAS data SNP04_gwascatalog.js. And add the following code to gwas.html.
<!-- Data configuration -->
<script src="./data/get_started_gwas/SNP04_gwascatalog.js"></script>
Initialize GWAS data in NG-Circos with data tag : SNP04_gwascatalog
Here GWAS data’s data tag is defined as SNP04_gwascatalog. So add the following code to gwas.html.
NGCircos01 = new NGCircos(SNP04_gwascatalog,NGCircosGenome,{
Now, “gwas.html” is as follows:
   <!DOCTYPE html>
   <html>
       <head>
           <meta charset="utf-8">
           <title>NGCircos.js</title>
       </head>
       <body>
           <!-- NGCircos.js, Jquery.js and D3.js import -->
           <script src="./lib/jquery.js"></script>
           <script src="./lib/d3.js"></script>
           <script src="./lib/NGCircos.js"></script>
           <!-- Prepare a <div> tag with "NGCircos" id to set the picture position your will draw in html -->
           <div id="NGCircos"></div>
   <!-- Data configuration -->
   <script src="./data/get_started_gwas/SNP04_gwascatalog.js"></script>
   <!-- Genome configuration -->
   <script>
     var NGCircosGenome = [
 [
        ["1" , 249250621],
        ["2" , 243199373],
        ["3" , 198022430],
        ["4" , 191154276],
        ["5" , 180915260],
        ["6" , 171115067],
        ["7" , 159138663],
        ["8" , 146364022],
        ["9" , 141213431],
        ["10" , 135534747],
        ["11" , 135006516],
        ["12" , 133851895],
        ["13" , 115169878],
        ["14" , 107349540],
        ["15" , 102531392],
        ["16" , 90354753],
        ["17" , 81195210],
        ["18" , 78077248],
        ["19" , 59128983],
        ["20" , 63025520],
        ["21" , 48129895],
        ["22" , 51304566],
        ["X" , 155270560],
        ["Y" , 59373566]
 ]
     ];
     NGCircos01 = new NGCircos(SNP04_gwascatalog,NGCircosGenome,{  // Initialize NG-Circos with "NGCircosGenome" and Main configuration
     //Main configuration
        target : "NGCircos",                       // Main configuration "target"
        svgWidth : 900,                             // Main configuration "svgWidth"
        svgHeight : 600,                            // Main configuration "svgHeight"
   svgClassName: "NGCircos",                  // Main configuration "svgClassName"
        chrPad : 0.04,                              // Main configuration "chrPad"
        innerRadius: 246,                           // Main configuration "innerRadius"
        outerRadius: 270,                           // Main configuration "outerRadius"
     });
     NGCircos01.draw_genome(NGCircos01.genomeLength); // NG-Circos callback
NGCircos01.draw_genome(NGCircos01.genomeLength2); // NG-Circos callback second time
   </script>
       </body>
   </html>
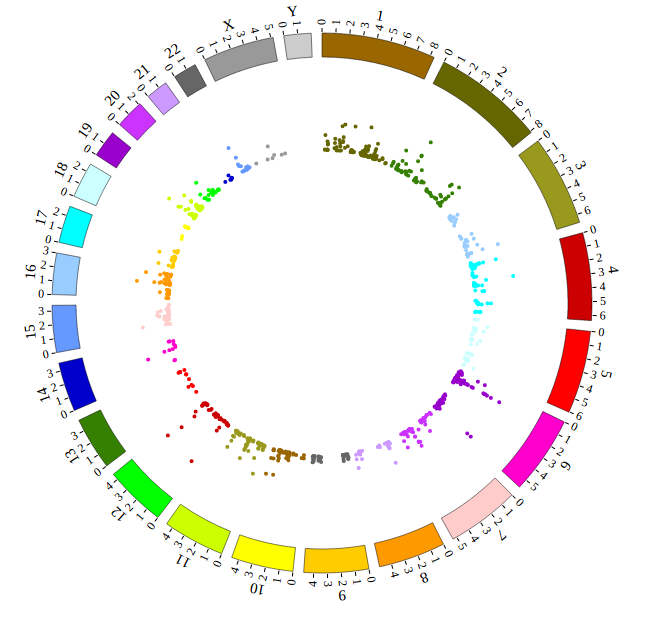
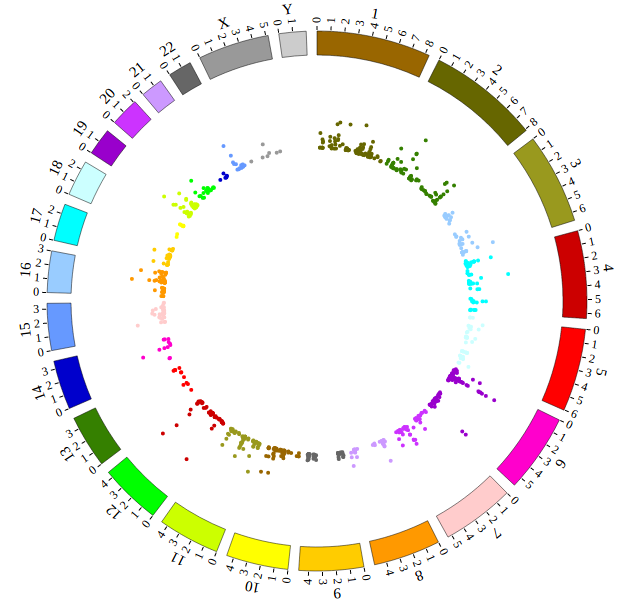
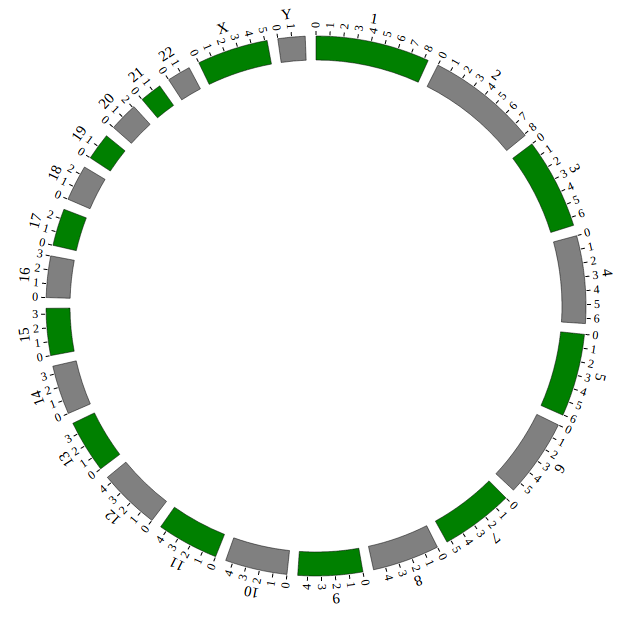
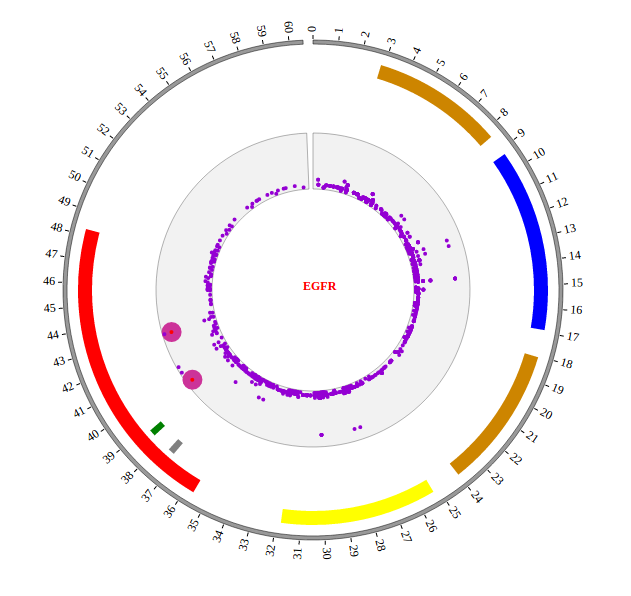
Open “gwas.html” file with your local browser and view it as below:
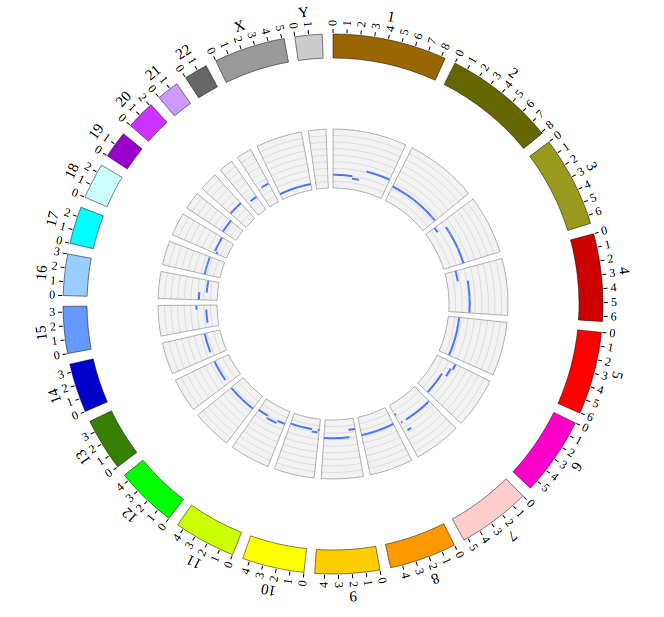
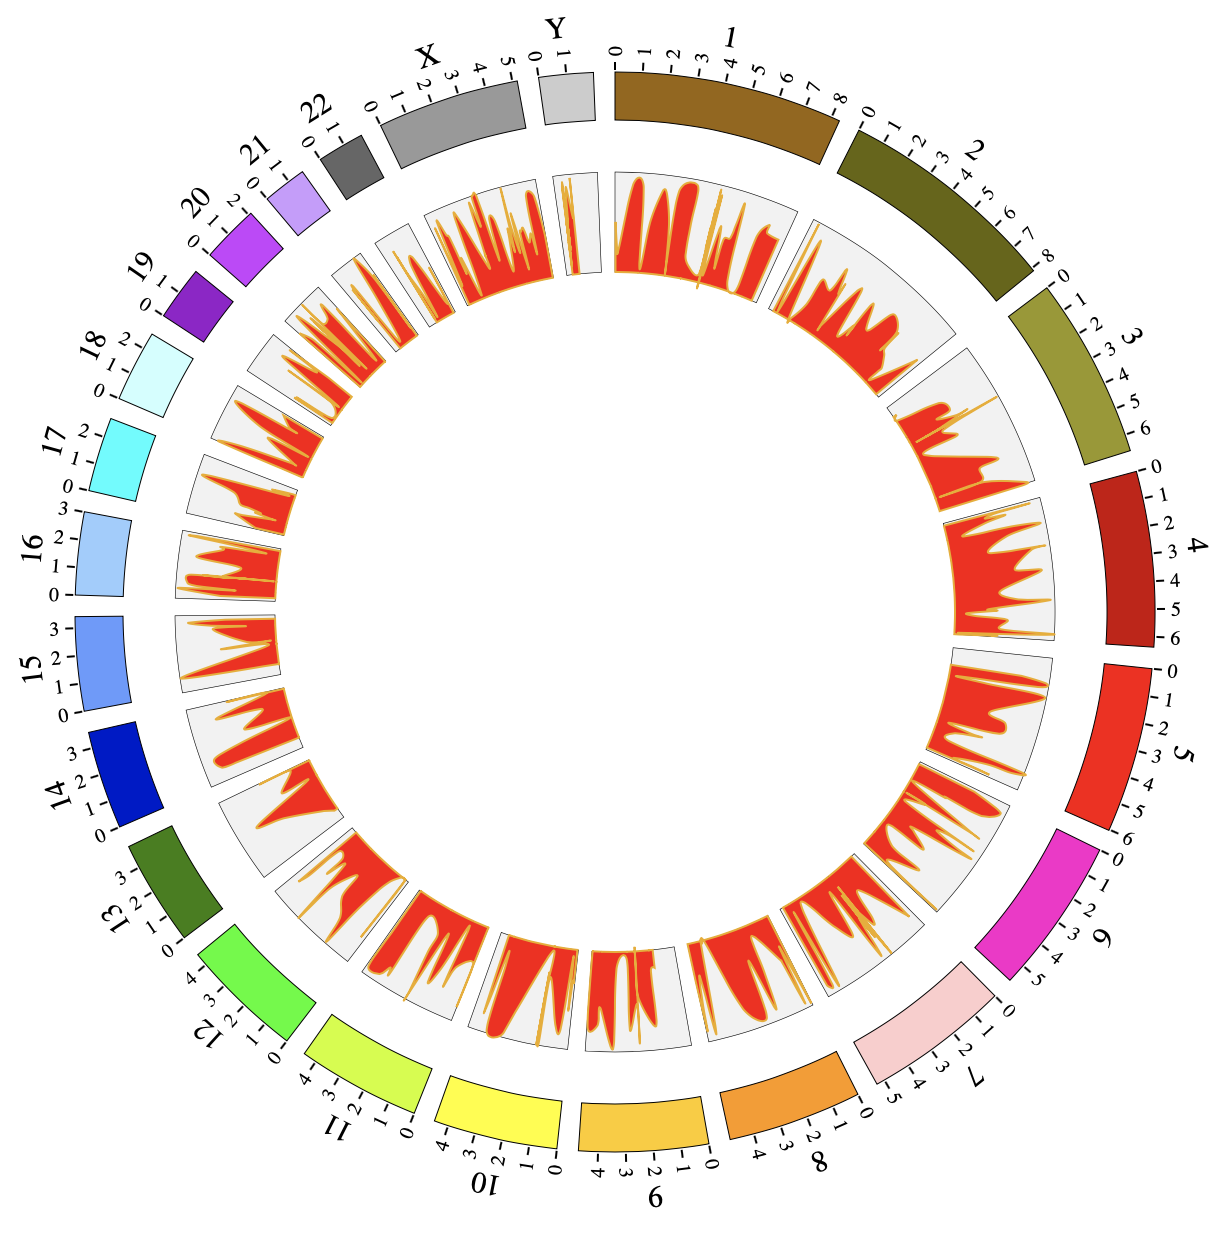
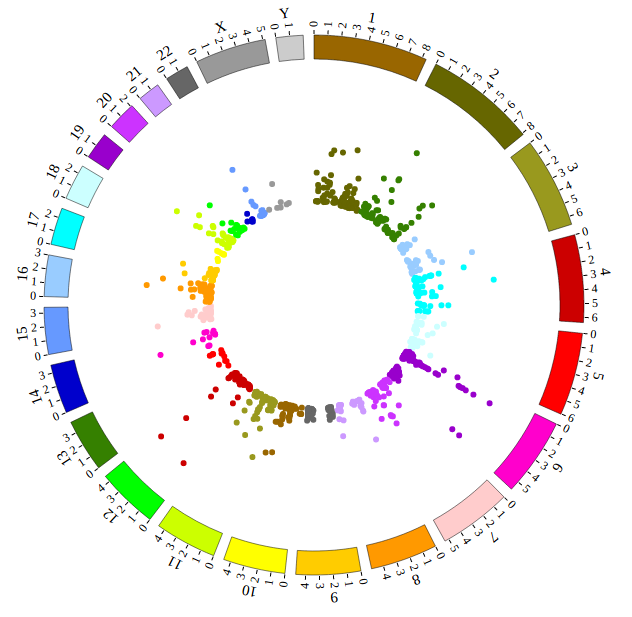
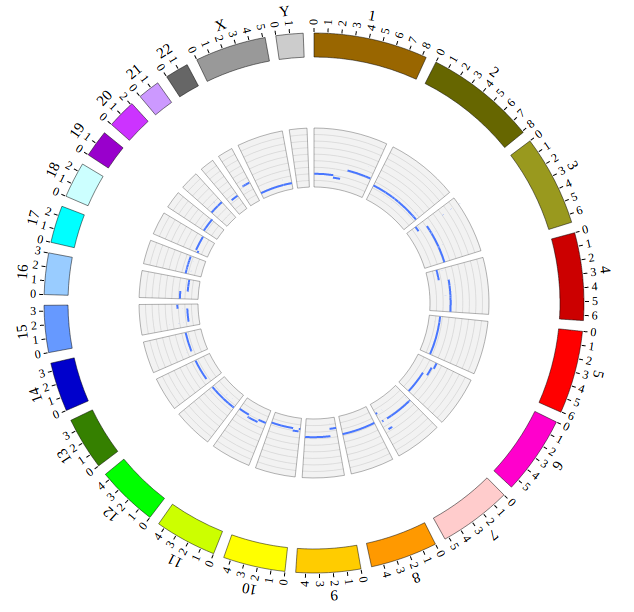
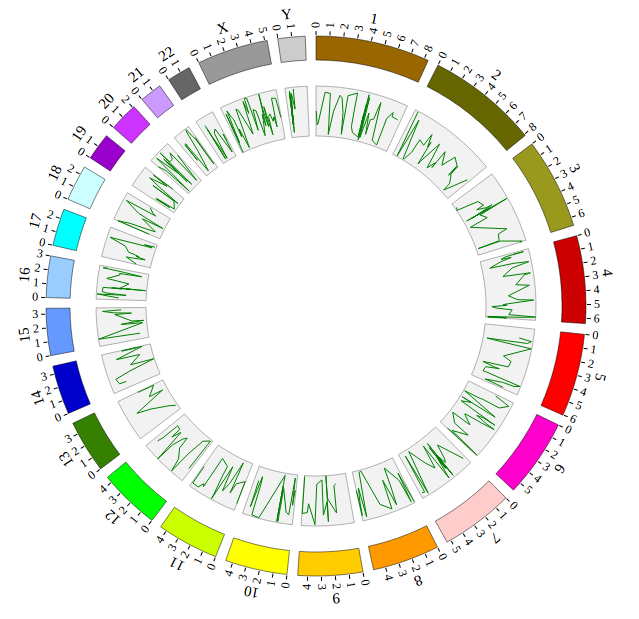
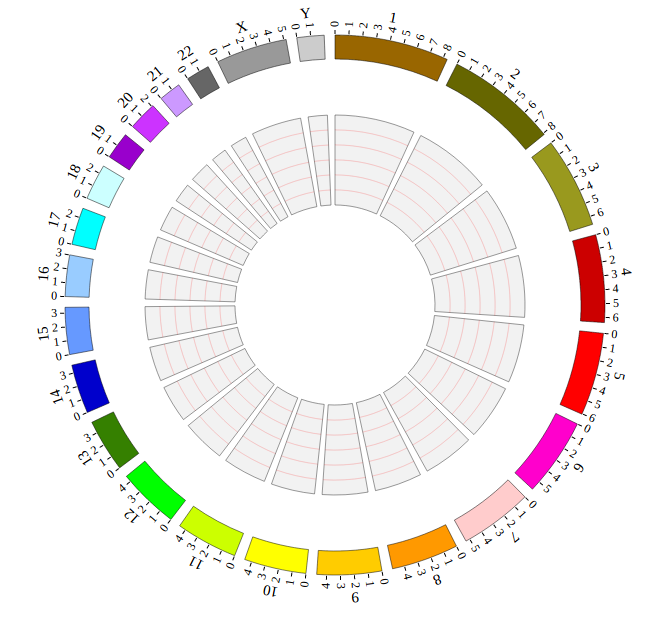
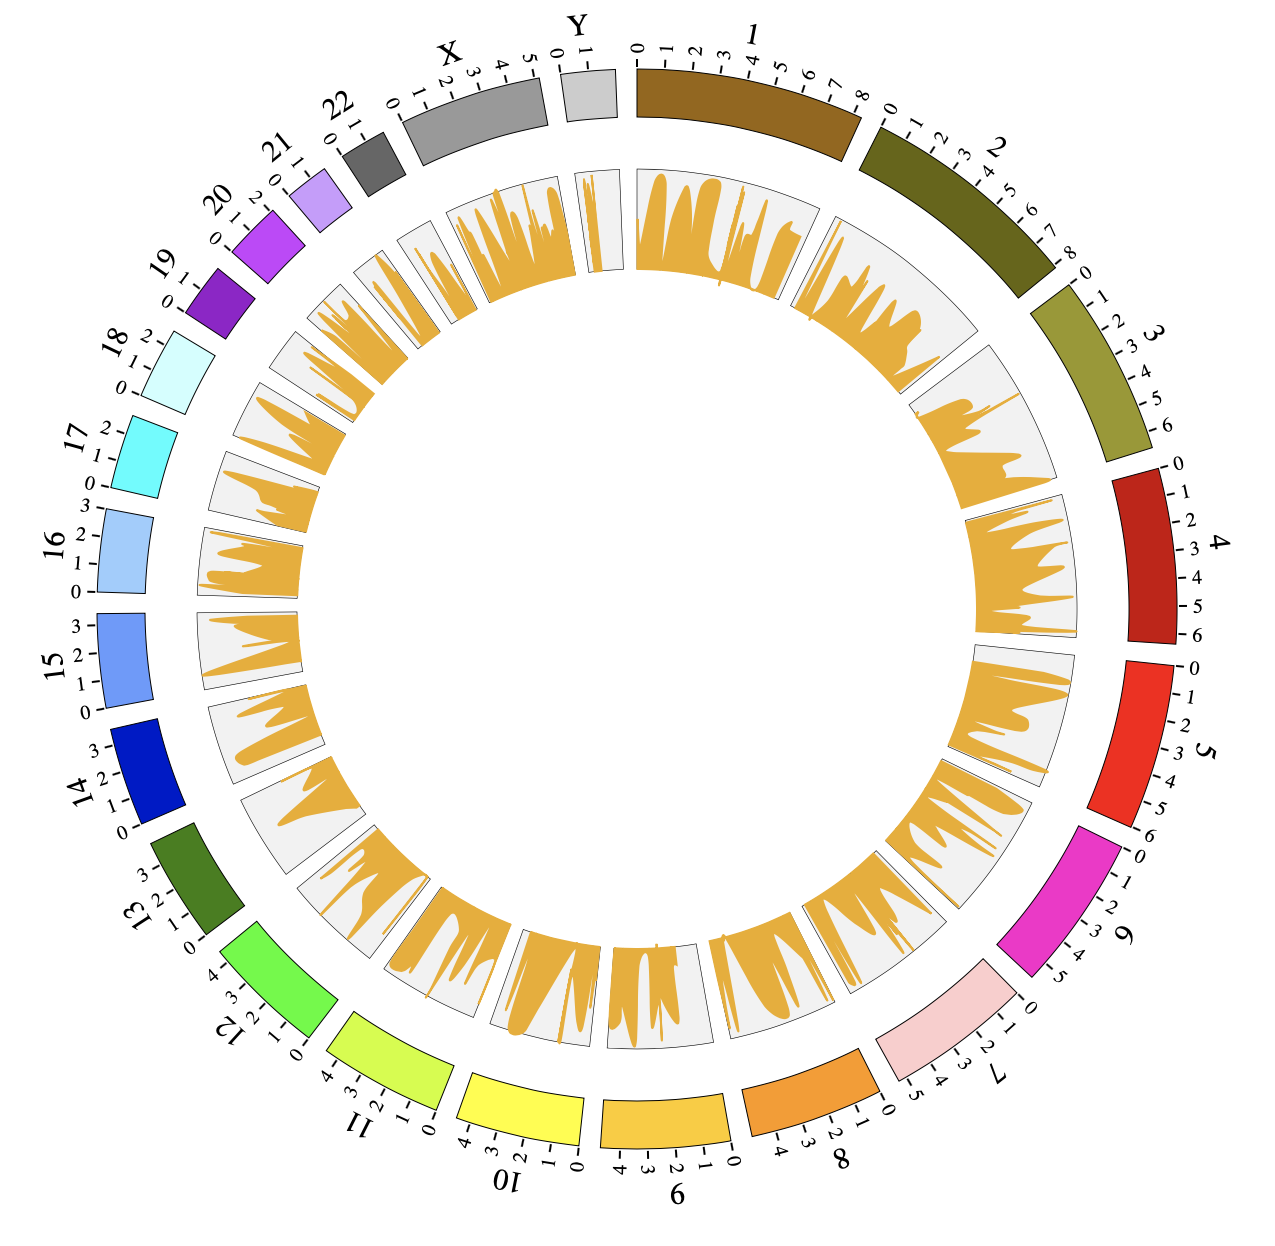
Step5.2 Display Background using BACKGROUND module
Including BACKGROUND module configuration
BACKGROUND module’s configuration is short. So we can also include BACKGROUND module as the way below.
Note
if your data in other module, such as SNP module, is not too much and the file is short, you can also include it as the way below.
<script>
var BACKGROUND01 = [ "BACKGROUND01" , {
  BginnerRadius: 205,
  BgouterRadius: 153,
  BgFillColor: "#F2F2F2",
  BgborderColor : "#000",
  BgborderSize : 0.3
}];
</script>
Initialize BACKGROUND module with data tag : BACKGROUND01
Here the data tag is defined as BACKGROUND01. So add the following code to gwas.html.
NGCircos01 = new NGCircos(BACKGROUND01,SNP04_gwascatalog,NGCircosGenome,{
Now, “gwas.html” is as follows:
   <!DOCTYPE html>
   <html>
       <head>
           <meta charset="utf-8">
           <title>NGCircos.js</title>
       </head>
       <body>
           <!-- NGCircos.js, Jquery.js and D3.js import -->
           <script src="./lib/jquery.js"></script>
           <script src="./lib/d3.js"></script>
           <script src="./lib/NGCircos.js"></script>
           <!-- Prepare a <div> tag with "NGCircos" id to set the picture position your will draw in html -->
           <div id="NGCircos"></div>
   <!-- Data configuration -->
   <script src="./data/get_started_gwas/SNP04_gwascatalog.js"></script>
   <script>
   var BACKGROUND01 = [ "BACKGROUND01" , {
     BginnerRadius: 205,
     BgouterRadius: 153,
     BgFillColor: "#F2F2F2",
     BgborderColor : "#000",
     BgborderSize : 0.3
   }];
   </script>
   <!-- Genome configuration -->
   <script>
     var NGCircosGenome = [
 [
        ["1" , 249250621],
        ["2" , 243199373],
        ["3" , 198022430],
        ["4" , 191154276],
        ["5" , 180915260],
        ["6" , 171115067],
        ["7" , 159138663],
        ["8" , 146364022],
        ["9" , 141213431],
        ["10" , 135534747],
        ["11" , 135006516],
        ["12" , 133851895],
        ["13" , 115169878],
        ["14" , 107349540],
        ["15" , 102531392],
        ["16" , 90354753],
        ["17" , 81195210],
        ["18" , 78077248],
        ["19" , 59128983],
        ["20" , 63025520],
        ["21" , 48129895],
        ["22" , 51304566],
        ["X" , 155270560],
        ["Y" , 59373566]
 ]
     ];
     NGCircos01 = new NGCircos(BACKGROUND01,SNP04_gwascatalog,NGCircosGenome,{  // Initialize NG-Circos with "NGCircosGenome" and Main configuration
     //Main configuration
        target : "NGCircos",                       // Main configuration "target"
        svgWidth : 900,                             // Main configuration "svgWidth"
        svgHeight : 600,                            // Main configuration "svgHeight"
   svgClassName: "NGCircos",                  // Main configuration "svgClassName"
        chrPad : 0.04,                              // Main configuration "chrPad"
        innerRadius: 246,                           // Main configuration "innerRadius"
        outerRadius: 270,                           // Main configuration "outerRadius"
     });
     NGCircos01.draw_genome(NGCircos01.genomeLength); // NG-Circos callback
NGCircos01.draw_genome(NGCircos01.genomeLength2); // NG-Circos callback second time
   </script>
       </body>
   </html>
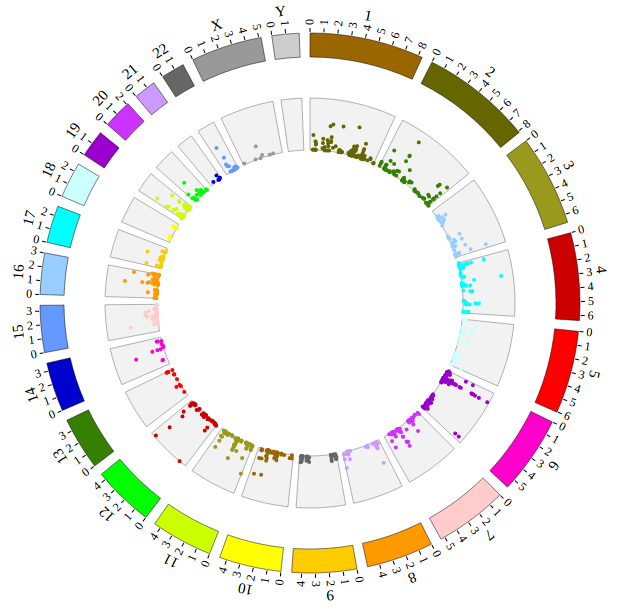
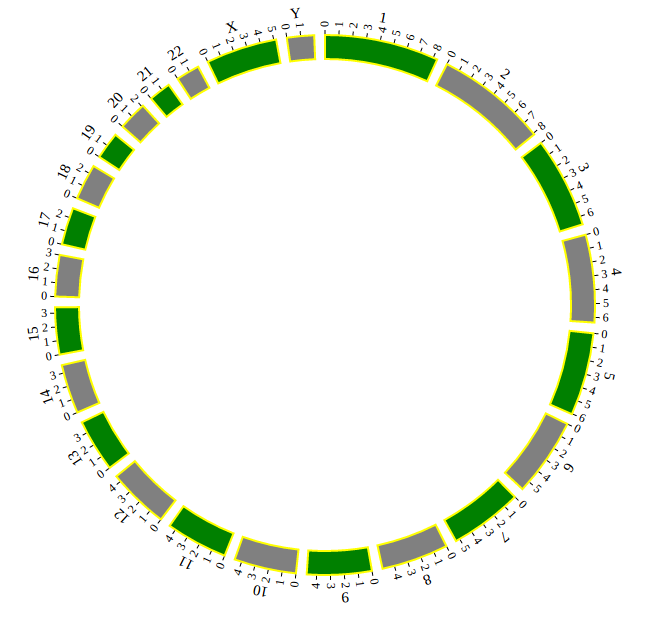
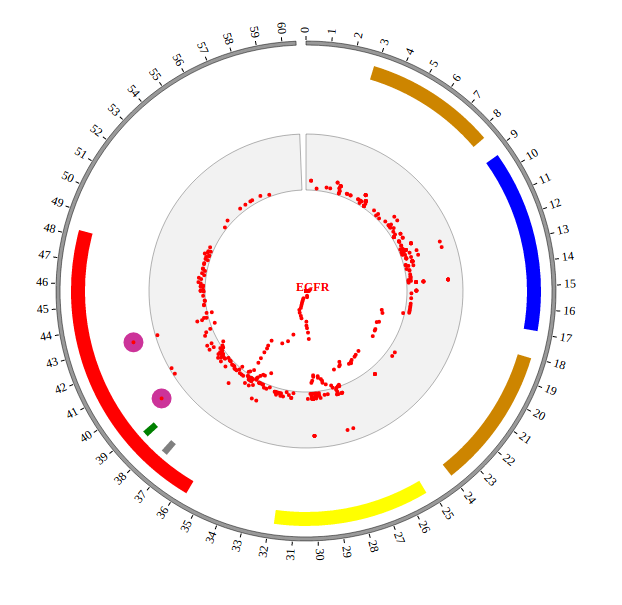
Open “gwas.html” file with your local browser and view it as below:
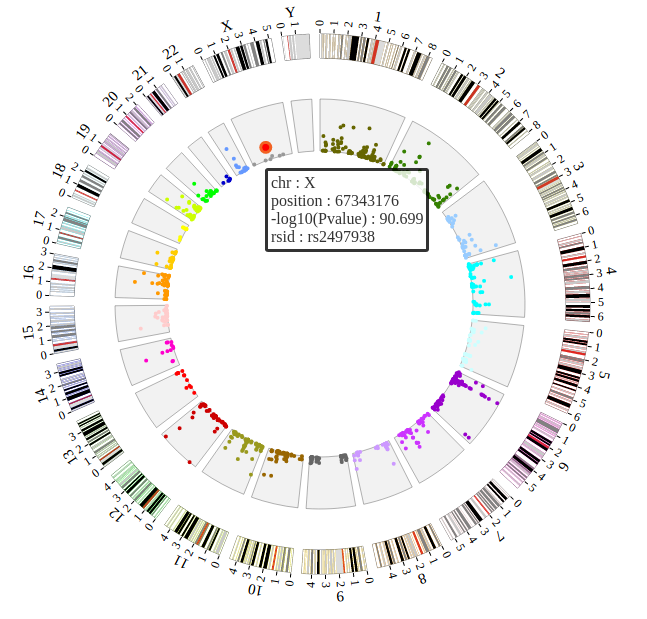
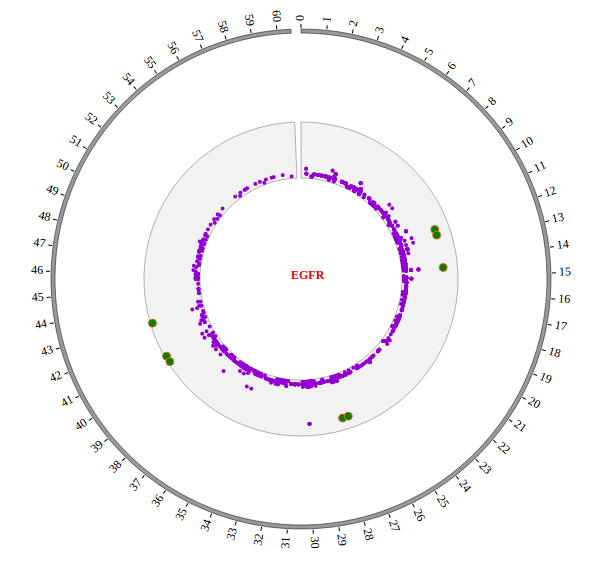
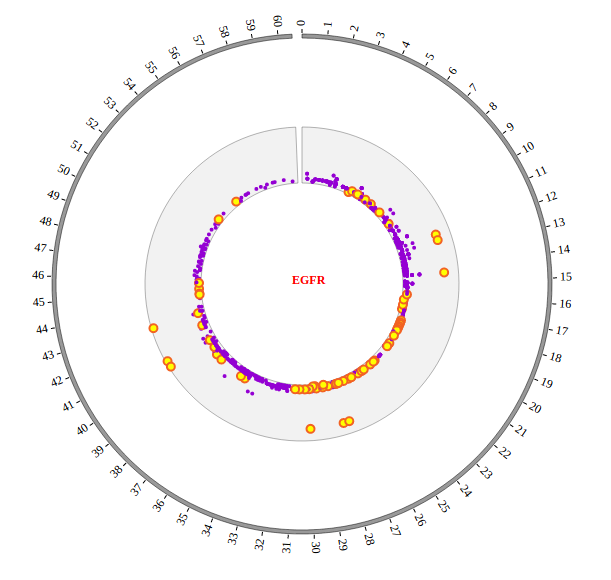
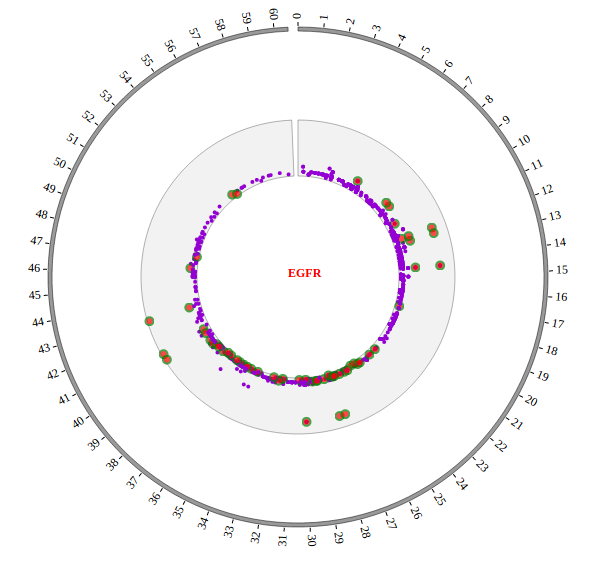
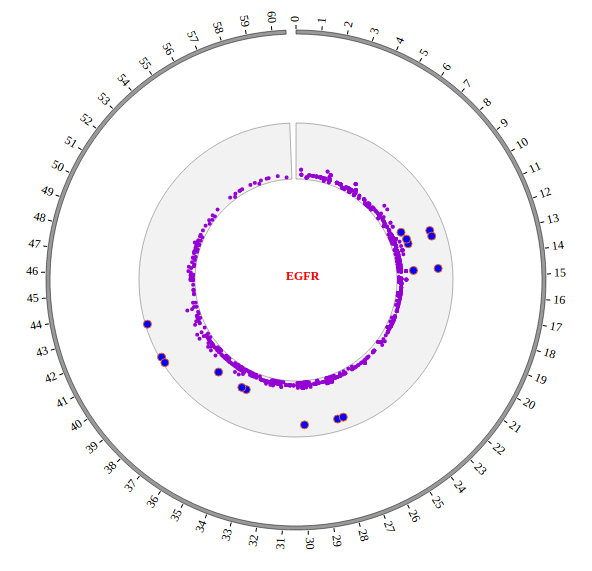
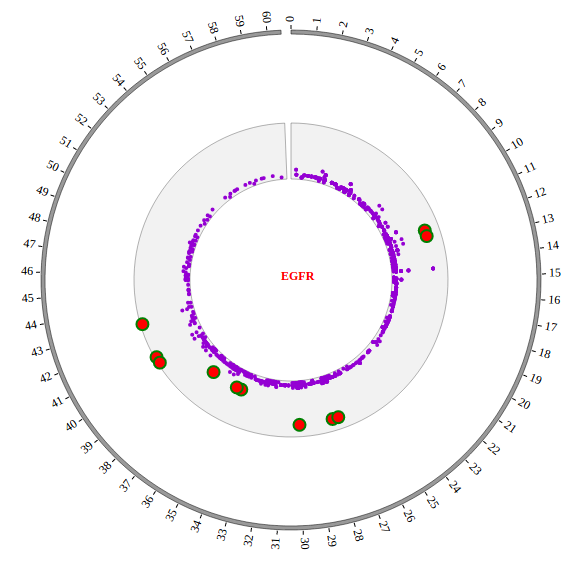
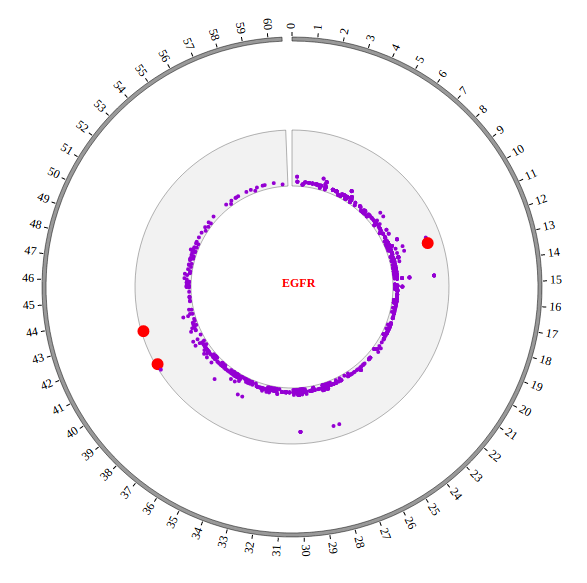
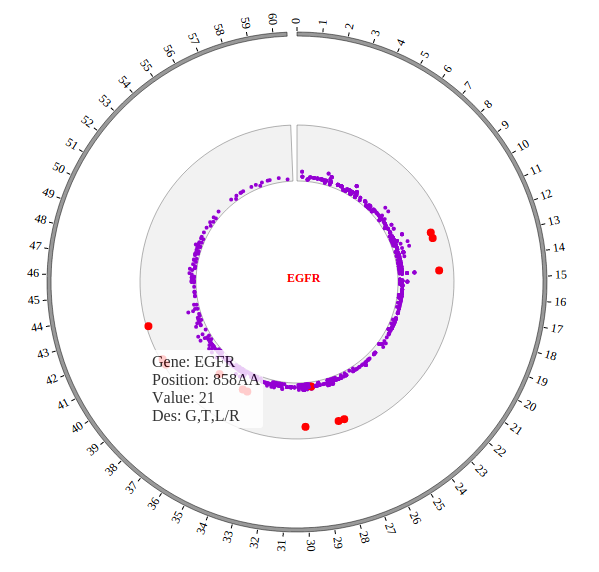
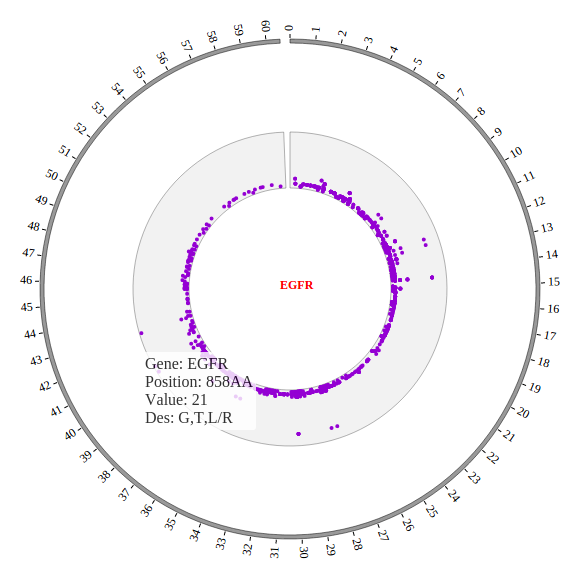
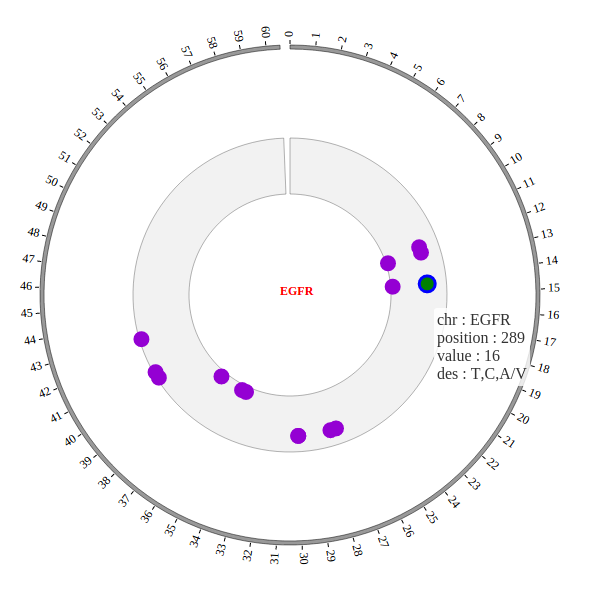
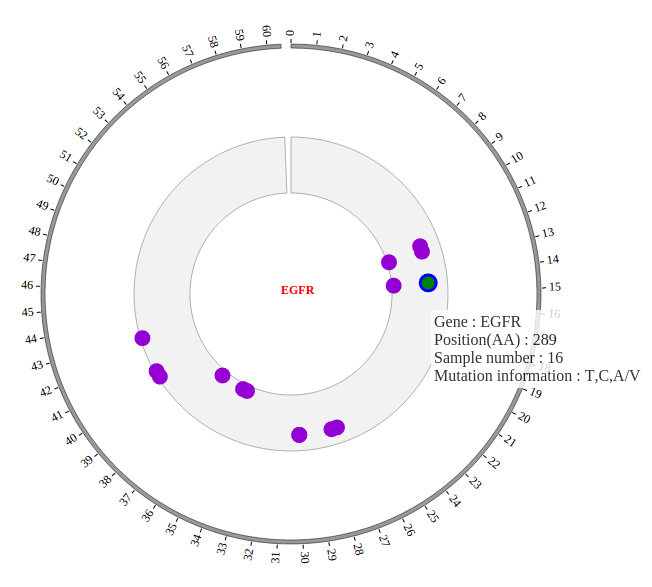
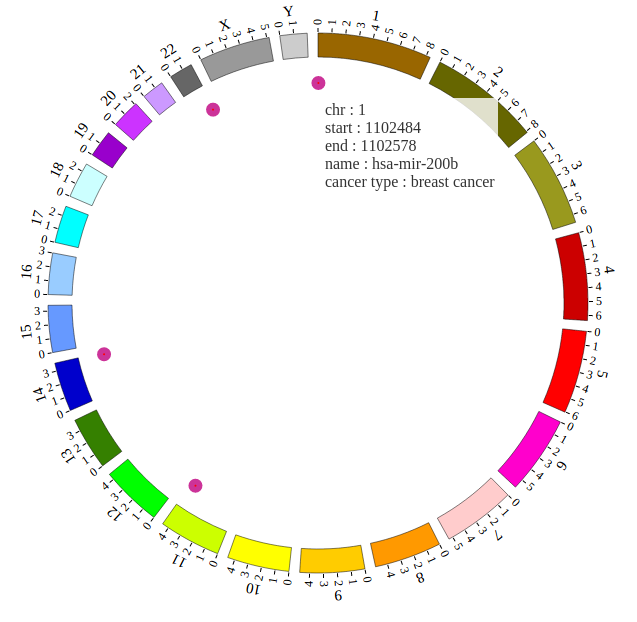
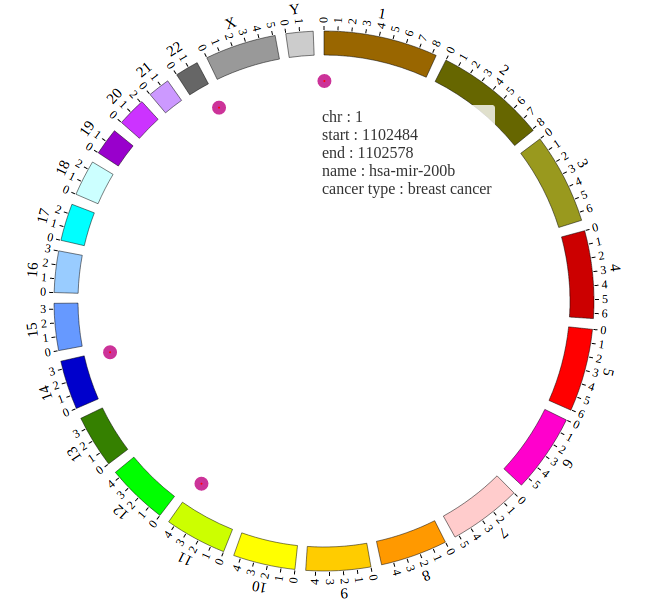
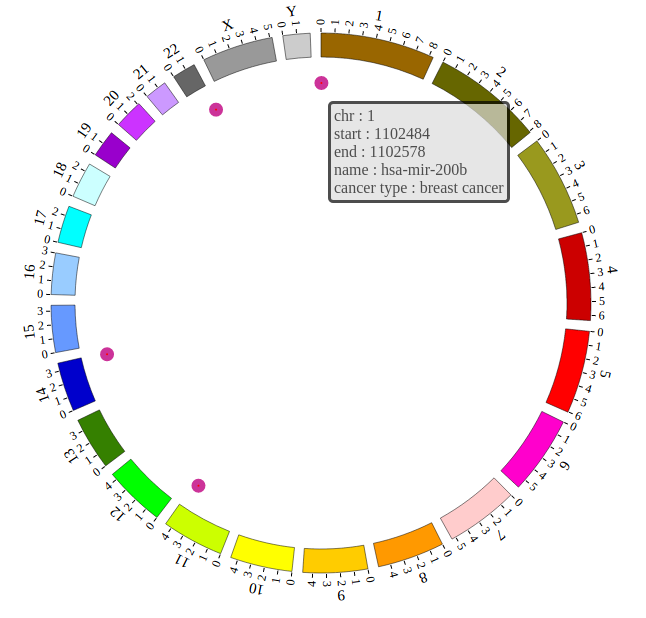
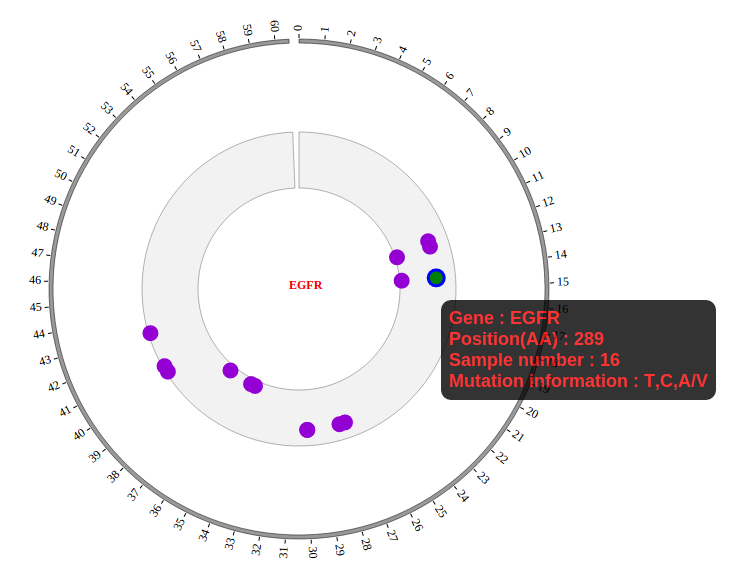
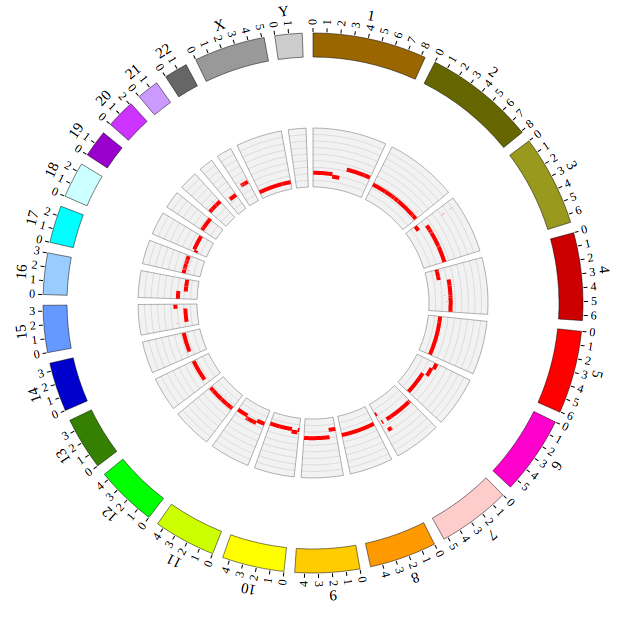
Step5.3 Open MouseOver and MouseOut events of SNP module in “Main configuration”
Here we configure “Customize Events” and “Customize Tooltips” two classes in “Main configuration” to open MouseOver and MouseOut events. More attributes can be found in “Main configuration” part of this document. Attributes used here are below:
Main configuration |
Value |
Class |
Description |
|---|---|---|---|
|
true |
Customize Events |
default false, [true/false], open/not open mouse mouse Over event of SNP module |
|
“red” |
Customize Events |
default “red”, “none” means no change, element change color after mouse Over the element |
|
5 |
Customize Events |
default 2, “none” means no change, element change circle size after mouse Over the element |
|
1.0 |
Customize Events |
default 1.0, “none” means no change, element change opacity after mouse Over the element |
|
“#F26223” |
Customize Events |
default “#F26223”, “none” means no change, element change stroke color after mouse Over the element |
|
3 |
Customize Events |
default 3, “none” means no change, element change stroke width after mouse Over the element |
|
“style” |
Built in styles or customize tooltips |
default “chr : “ |
|
” “ |
Customize Tooltips |
default ” “ |
|
1 |
Customize Tooltips |
default 0 |
|
true |
Customize Events |
default false, [true/false], open/not open mouse mouse out event of SNP module |
|
700 |
Customize Events |
default 500, animation time after mouse out the element |
|
“none” |
Customize Events |
default “red”, “none” means no change, element change color after mouse out the element |
|
“none” |
Customize Events |
default 2, “none” means no change, element change circle size after mouse out the element |
|
1.0 |
Customize Events |
default 1.0, “none” means no change, element change opacity after mouse out the element |
|
0 |
Customize Events |
default 0, “none” means no change, element change stroke width after mouse out the element |
   NGCircos01 = new NGCircos(BACKGROUND01,SNP04_gwascatalog,NGCircosGenome,{
   //Main configuration
      target : "NGCircos",
      svgWidth : 900,
      svgHeight : 600,
 svgClassName: "NGCircos",
      chrPad : 0.04,
      innerRadius: 246,
      outerRadius: 270,
      SNPMouseOverDisplay : true,
      SNPMouseOverColor : "red",
      SNPMouseOverCircleSize : 5,
      SNPMouseOverCircleOpacity : 1.0,
      SNPMouseOverCircleStrokeColor : "#F26223",
      SNPMouseOverCircleStrokeWidth : 3,
SNPMouseOverTooltipsSetting :"style1",
      SNPMouseOverTooltipsHtml : " ",
      SNPMouseOverTooltipsBorderWidth : 1,
      SNPMouseOutDisplay : true,
      SNPMouseOutAnimationTime : 700,
      SNPMouseOutColor : "none",
      SNPMouseOutCircleSize : "none",
      SNPMouseOutCircleOpacity : 1.0,
      SNPMouseOutCircleStrokeWidth : 0,
   });
Now, “gwas.html” is as follows:
   <!DOCTYPE html>
   <html>
       <head>
           <meta charset="utf-8">
           <title>NGCircos.js</title>
       </head>
       <body>
           <!-- NGCircos.js, Jquery.js and D3.js import -->
           <script src="./lib/jquery.js"></script>
           <script src="./lib/d3.js"></script>
           <script src="./lib/NGCircos.js"></script>
           <!-- Prepare a <div> tag with "NGCircos" id to set the picture position your will draw in html -->
           <div id="NGCircos"></div>
   <!-- Data configuration -->
   <script src="./data/get_started_gwas/SNP04_gwascatalog.js"></script>
   <script>
   var BACKGROUND01 = [ "BACKGROUND01" , {
     BginnerRadius: 205,
     BgouterRadius: 153,
     BgFillColor: "#F2F2F2",
     BgborderColor : "#000",
     BgborderSize : 0.3
   }];
   </script>
   <!-- Genome configuration -->
   <script>
     var NGCircosGenome = [
 [
        ["1" , 249250621],
        ["2" , 243199373],
        ["3" , 198022430],
        ["4" , 191154276],
        ["5" , 180915260],
        ["6" , 171115067],
        ["7" , 159138663],
        ["8" , 146364022],
        ["9" , 141213431],
        ["10" , 135534747],
        ["11" , 135006516],
        ["12" , 133851895],
        ["13" , 115169878],
        ["14" , 107349540],
        ["15" , 102531392],
        ["16" , 90354753],
        ["17" , 81195210],
        ["18" , 78077248],
        ["19" , 59128983],
        ["20" , 63025520],
        ["21" , 48129895],
        ["22" , 51304566],
        ["X" , 155270560],
        ["Y" , 59373566]
 ]
     ];

     NGCircos01 = new NGCircos(BACKGROUND01,SNP04_gwascatalog,NGCircosGenome,{
     //Main configuration
        target : "NGCircos",
        svgWidth : 900,
        svgHeight : 600,
   svgClassName: "NGCircos",
        chrPad : 0.04,
        innerRadius: 246,
        outerRadius: 270,
        SNPMouseOverDisplay : true,
        SNPMouseOverColor : "red",
        SNPMouseOverCircleSize : 5,
        SNPMouseOverCircleOpacity : 1.0,
        SNPMouseOverCircleStrokeColor : "#F26223",
        SNPMouseOverCircleStrokeWidth : 3,
        SNPMouseOverTooltipsSetting :"style1",
  SNPMouseOverTooltipsHtml : " ",
        SNPMouseOverTooltipsBorderWidth : 1,
        SNPMouseOutDisplay : true,
        SNPMouseOutAnimationTime : 700,
        SNPMouseOutColor : "none",
        SNPMouseOutCircleSize : "none",
        SNPMouseOutCircleOpacity : 1.0,
        SNPMouseOutCircleStrokeWidth : 0,
     });
     NGCircos01.draw_genome(NGCircos01.genomeLength);
NGCircos01.draw_genome(NGCircos01.genomeLength2);
   </script>
       </body>
   </html>
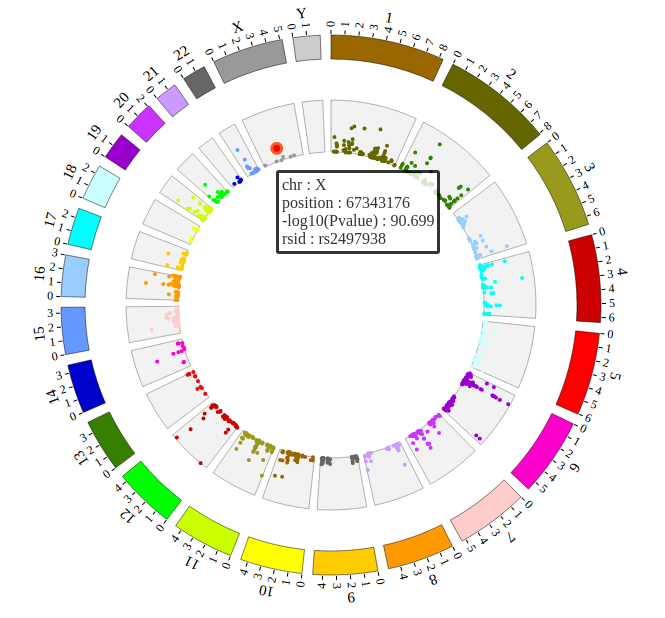
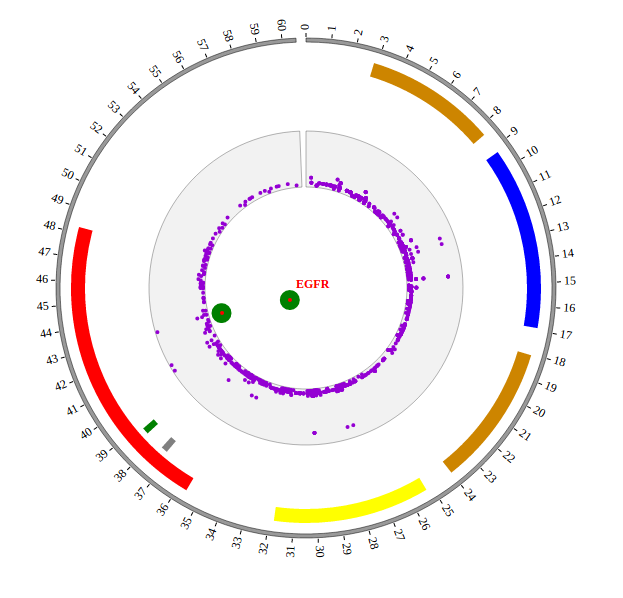
Open “gwas.html” file with your local browser and view it as below:
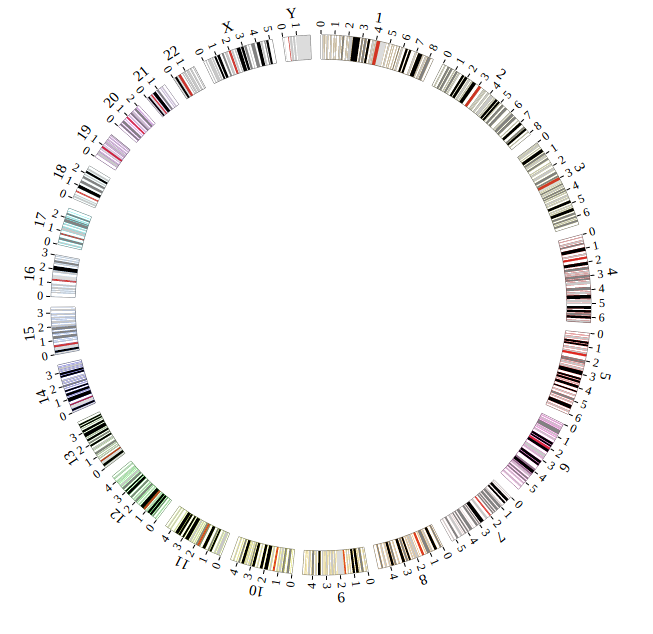
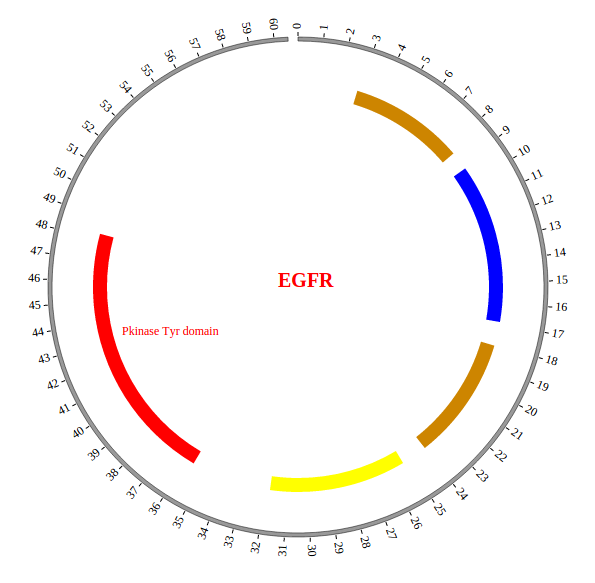
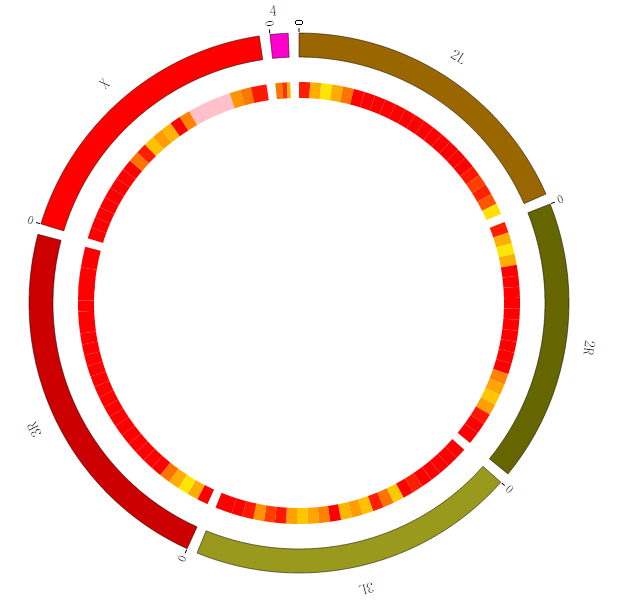
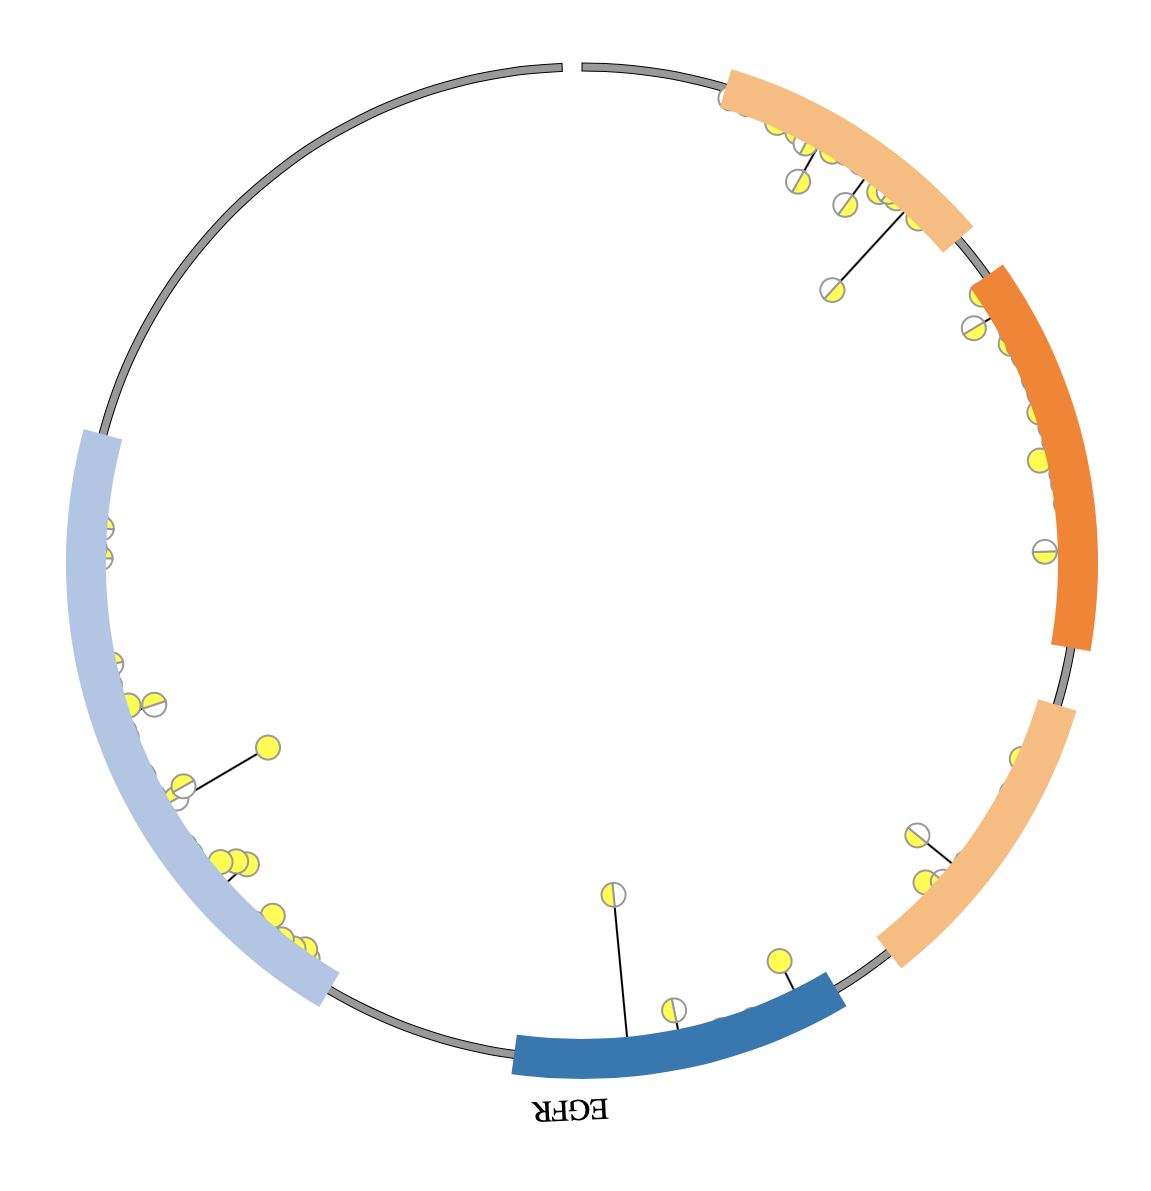
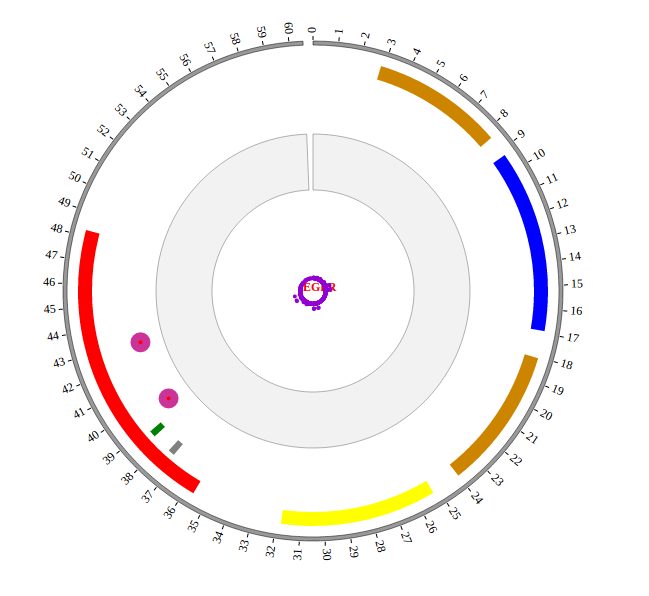
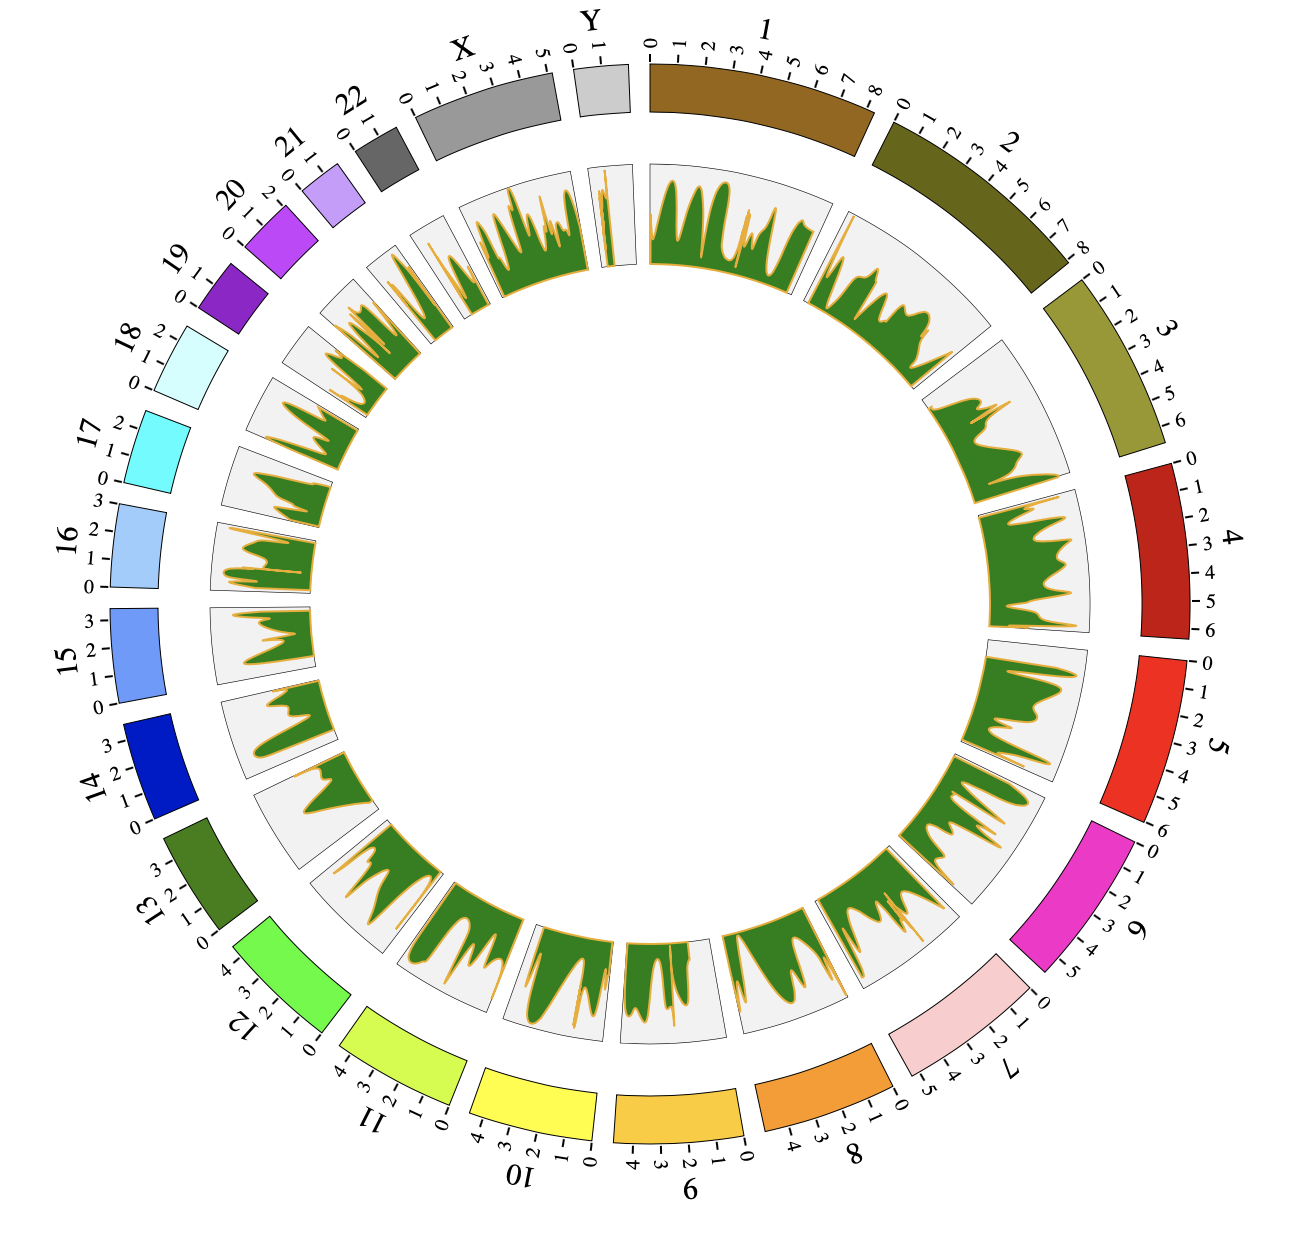
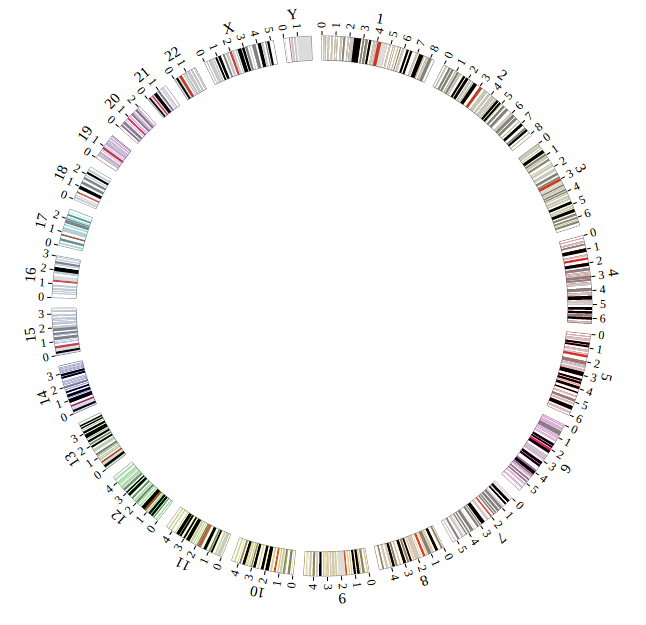
Step5.4 Dispaly Chromosome band using ARC module
The chromosome band represents the approximate location of bands seen on Giemsa-stained chromosomes. We have provided some commonly used genomes as below. The color of chromosome band is the same as Circos.
Species |
Genome version |
Data name |
Genome |
cytoBand in UCSC |
|---|---|---|---|---|
Human |
grch38 |
ARC_grch38 |
||
Human |
hg19 |
ARC_hg19 |
||
human |
hg18 |
ARC_hg18 |
||
Mouse |
mm10 |
ARC_mm10 |
||
Mouse |
mm9 |
ARC_mm9 |
Here we take hg19 as an example to explain how to build these files.
Input chromosome band data
We download chromosome band data from UCSC. Then we follow Circos’s color settings on chromosome band to add the color column. We saved the data in karyotype.human.hg19.txt, as below:
1       0       2300000 rgb(255,255,255)
1       2300000 5400000 rgb(200,200,200)
1       5400000 7200000 rgb(255,255,255)
1       7200000 9200000 rgb(200,200,200)
......
Y       19800000        22100000        rgb(255,255,255)
Y       22100000        26200000        rgb(200,200,200)
Y       26200000        28800000        rgb(255,255,255)
Y       28800000        59373566        rgb(220,220,220)
Use “Data Preparation Tools” to prepare data
Note
You need to install the python 3, before running NGCircos_PrepareData.py. You can skip this step, just download karyotype.human.hg19.js for the next step.
We provide a python program NGCircos_PrepareData.py to help users prepare the input data for each module of NG-Circos
python NGCircos_PrepareData.py ARC karyotype.human.hg19.txt > karyotype.human.hg19.js
Move karyotype.human.hg19.js to ./NGCircos_demos/data/ in your local.
Output chromosome band data used in NG-Circos
ARC_hg19 = [ "ARC_hg19" , {
  innerRadius: -0,
  outerRadius: -0,
} , [
  {chr: "1", start: "0" , end: "2300000", color: "rgb(255,255,255)"},
  {chr: "1", start: "2300000" , end: "5400000", color: "rgb(200,200,200)"},
  {chr: "1", start: "5400000" , end: "7200000", color: "rgb(255,255,255)"},
  {chr: "1", start: "7200000" , end: "9200000", color: "rgb(200,200,200)"},
  ......
  {chr: "Y", start: "19800000" , end: "22100000", color: "rgb(255,255,255)"},
  {chr: "Y", start: "22100000" , end: "26200000", color: "rgb(200,200,200)"},
  {chr: "Y", start: "26200000" , end: "28800000", color: "rgb(255,255,255)"},
  {chr: "Y", start: "28800000" , end: "59373566", color: "rgb(220,220,220)"},
]];
Including chromosome band data karyotype.human.hg19.js
Use <script> tag to include chromosome band data karyotype.human.hg19.js. And add the following code to gwas.html.
<!-- Data configuration -->
<script src="../data/get_started_gwas/karyotype.human.hg19.js"></script>
Initialize chromosome band data in NG-Circos with data tag : ARC_hg19
Here chromosome band data’s data tag is defined as ARC_hg19. So add the following code to gwas.html.
NGCircos01 = new NGCircos(ARC_hg19,SNP04_gwascatalog,NGCircosGenome,{
Now, “gwas.html” is as follows:
   <!DOCTYPE html>
   <html>
       <head>
           <meta charset="utf-8">
           <title>NGCircos.js</title>
       </head>
       <body>
           <!-- NGCircos.js, Jquery.js and D3.js import -->
           <script src="./lib/jquery.js"></script>
           <script src="./lib/d3.js"></script>
           <script src="./lib/NGCircos.js"></script>
           <!-- Prepare a <div> tag with "NGCircos" id to set the picture position your will draw in html -->
           <div id="NGCircos"></div>
   <!-- Data configuration -->
   <script src="./data/karyotype.human.hg19.js"></script>
   <script src="./data/get_started_gwas/SNP04_gwascatalog.js"></script>
   <script>
   var BACKGROUND01 = [ "BACKGROUND01" , {
     BginnerRadius: 205,
     BgouterRadius: 153,
     BgFillColor: "#F2F2F2",
     BgborderColor : "#000",
     BgborderSize : 0.3
   }];
   </script>
   <!-- Genome configuration -->
   <script>
     var NGCircosGenome = [
 [
        ["1" , 249250621],
        ["2" , 243199373],
        ["3" , 198022430],
        ["4" , 191154276],
        ["5" , 180915260],
        ["6" , 171115067],
        ["7" , 159138663],
        ["8" , 146364022],
        ["9" , 141213431],
        ["10" , 135534747],
        ["11" , 135006516],
        ["12" , 133851895],
        ["13" , 115169878],
        ["14" , 107349540],
        ["15" , 102531392],
        ["16" , 90354753],
        ["17" , 81195210],
        ["18" , 78077248],
        ["19" , 59128983],
        ["20" , 63025520],
        ["21" , 48129895],
        ["22" , 51304566],
        ["X" , 155270560],
        ["Y" , 59373566]
 ]
     ];

     NGCircos01 = new NGCircos(ARC_hg19,BACKGROUND01,SNP04_gwascatalog,NGCircosGenome,{
     //Main configuration
        target : "NGCircos",
        svgWidth : 900,
        svgHeight : 600,
   svgClassName: "NGCircos",
        chrPad : 0.04,
        innerRadius: 246,
        outerRadius: 270,
        SNPMouseOverDisplay : true,
        SNPMouseOverColor : "red",
        SNPMouseOverCircleSize : 5,
        SNPMouseOverCircleOpacity : 1.0,
        SNPMouseOverCircleStrokeColor : "#F26223",
        SNPMouseOverCircleStrokeWidth : 3,
        SNPMouseOverTooltipsSetting :"style1",
  SNPMouseOverTooltipsHtml : " ",
        SNPMouseOverTooltipsBorderWidth : 1,
        SNPMouseOutDisplay : true,
        SNPMouseOutAnimationTime : 700,
        SNPMouseOutColor : "none",
        SNPMouseOutCircleSize : "none",
        SNPMouseOutCircleOpacity : 1.0,
        SNPMouseOutCircleStrokeWidth : 0,
     });
     NGCircos01.draw_genome(NGCircos01.genomeLength);
NGCircos01.draw_genome(NGCircos01.genomeLength2); // NG-Circos callback second time
   </script>
       </body>
   </html>
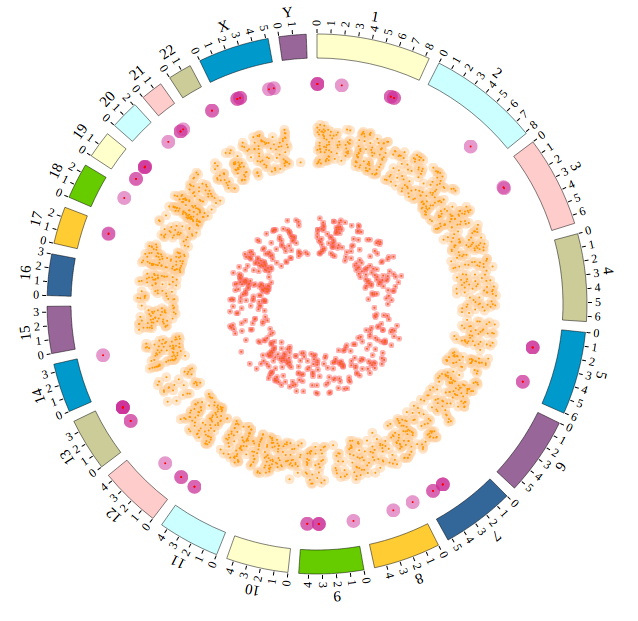
Open “gwas.html” file with your local browser and view it as below:


